AutoCAD 2009: New System Variables

A full list of the new system variables available for AutoCAD 2009.As mentioned on the previous post the guys of www.hyperpics.com have a great list of system variables for AutoCAD. Here I just want to list those new to AutoCAD 2009 for those whO start using the newest release and need a directory of what's new. With time I´ll try to describe the ones I find most relevant.
  • ACTPATH
  • ACTRECORDSTATE
  • ACTRECPATH
  • ACTUI
  • CAPTURETHUMBNAILS
  • DGNIMPORTMAX
  • DGNMAPPINGPATH
  • GEOLATLONGFORMAT
  • GEOMARKETVISIBILITY
  • LAYERMANAGERSTATE
  • MENUBAR
  • MLEADERSCALE
  • MTEXTTOOLBAR
  • NAVSWHEELMODE
  • NAVSWHEELOPACITYBIG
  • NAVSWHEELOPACITYMINI
  • NAVSWHEELSIZEBIG
  • NAVSWHEELSIZEMINI
  • NAVVCUBEDISPLAY
  • NAVVCUBELOCATION
  • NAVVCUBEOPACITY
  • NAVVCUBEORIENT
  • NAVVCUBESIZE
  • OPENPARTIAL
  • PREVIEWTYPE
  • PUBLISHHATCH
  • QPLOCATION
  • QPMODE
  • QVDRAWINGPIN
  • QVLAYOUTPIN
  • RIBBONSTATE
  • ROLLOVERTIPS
  • SHOWMOTIONPIN
  • STATUSBAR
  • THUMBSIZE

Show me more...

AutoCAD: List of system variables

We´v been commenting on many system variables. Discover them and get a link for the full list.
Català - Castellano
The list of system variables that AutoCAD has used or uses nowadays is too long to be included in a simple blog post (apparently 690 variables). Luckily the guys of www.hyperpics.com have a great list of the system variables available describing on which version are they available, released or suppressed.
This post just wants to acknowledge their effort putting together such a list and quickly list those that have been already analyzed by CAD Addict. Here is the list with links to those that have been previously described (future ones will be added to the end of the list).
All the posts describing system variables can be found through this link or using the search box on the side bar. For individual system variable descriptions click each one of the following:
  • ANNOAUTOSCALE: Control if annotative objects get new scales automatically.
  • EDGEMODE: Controls if the drawn objects work as cutting edges or their extension.
  • FILEDIA: Controls if Dialog Boxes are shown or not
  • FULLPLOTPATH: Send the full path to the plotter or just the file name
  • LAYLOCKFADECTL: Control the fading of locked layers
  • MAXSORT: Set the maximum number of objects in lists.
  • MENUBAR: Shows or hides the classic menu bar with pull down menus.
  • MIRRTEXT: Controls if mirrored text remain readable or truly flipped.
  • PELLIPSE: Controls if the ellipses are created as such or as polylines
  • PREVIEWFILTER: Set which objects have a selection preview
  • PROJMODE: control the projection mode for TRIM and EXTEND commands.
  • SELECTIONPREVIEW: Activate or deactivate the selection preview feature.
  • TASKBAR: Shows multiple windows or a single one on the windows taskbar.
  • VISRETAIN: Control the retention of visual changes on XREFs.
  • XCLIPFRAME: Shows or hides the frame used to clip XREFs, Blocks, etc
  • XDWGFADECTL: Controls the fading of inserted XREFs
  • XFADECTL: Control fading ob objects not on active space.

On the next post I am going to be listing the System variables that are new to AutoCAD 2009.

Show me more...

Photoshop: Fade Layers

A quick trick to create a fading effect on photoshop layers.
Català - Castellano
This is a bit off topic, but since Photoshop is one of the main tools we use to present what we first draw or model i think it is not completely out of place.
The fading effect for a layer is a very successful effect when making presentations. We might want to fade an image that we have to blend into another one or simply to make it disappear gradually.
The process is very simple. I´ll use a picture I took last week in Toronto.
I want the picture to fade till disappear. We need to add a layer mask. What we need to do is to select the layer we want to fade and click on the button shown in the image below.This will add a layer mask to the layer we want to fade. A layer mask is basically a transparency map for the layer it is applied to. Once we create the layer mask we will see this:
The layer mask is completely white by default, which means that all the image is set to opaque. If we want to fade the image we must add a gradient from white to black to achieve the fading effect we are looking for. Be sure that you have the layer mas selected and not the layer itself.
In this case I add a circular gradient to make the image fade equally from a center point to the edges. This is the gradient applied to the layer mask:And this is the result

Show me more...

AutoCAD: Fading Of Locked Layers

It is easy to control the fading of the locked layers if you know the right system variables.There are two system variables that will let us control the fading intensity of locked layers.
LAYLOCKFADECTL directly controls the intensity of the fading of locked layers. The higher the value we enter the more the layers will fade to show that they are locked.
XFADECTL controls the fading when we enter the REFEDIT mode. Everything that is not being edited will fade according to the intensity we set on this system variable.

Show me more...

AutoCAD: Taking advantatge of the Grips.

Do you take full advantage of the grips? They are more useful than you think.So what are the grips? For those newbies, the grips are those dots you see at the endpoint and midpoint of a line when you select it.So what are the grips? For those newbies, the grips are those dots you see at the endpoint and midpoint of a line when you select it.


At a first glance they might seem like a worthless feature, but they can actually save us a good amount of time if we know how to use them to the full extent. The basic use that almost everyone knows is to use the grips to stretch objects. If we select a line and click on one of the endpoint grips, we will be able to stretch the line from that point. It is actually kind of an automatized "Express Tool". When you click on the grip, check the command line bar, and you will see that the command STRETCH has been entered automatically.
If instead of the endpoint grip we select the midpoint grip, we will be able to move the line instead of modifying it. (see that the command that appears is still stretch, although in this case we move the line, we don't stretch it).
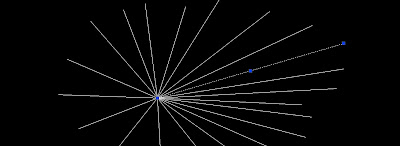
Well this were the basics that anyone knows, here comes the interesting part. Try to do the two previous steps while pressing Ctrl (you actually must have Ctrl pressed when you click the new position of the grip) What does it do? well it stretches or moves the line as well, but this time making a copy of the original that remains untouched. SO you could create all the lines you see below based on the original line without typing any command. Simpli hold Ctrl while clicking the new position of the grip (you only need to hold Ctrl for the first line, the subsequent ones will be copies without pressing Ctrl)


Is that it?? Not yet. What other keys can we use? Let's try Shift. As in many programs shift may be used to select multiple objects, or in today's scope, multiple grips. If we hold Shift while selecting a grip this will turn red, but it won't be dragged with the mouse pointer. If we keep selecting grips while pressing Shift, the grips will be added to the selection and then we can do with them more or less the same that we did to a single grip. For a single line this might not be very useful, but it is when we have a polyline or if we want to select grips of multiple objects. On the picture below we selected all the grips of the upper part of four rectangles. The we can stretch them all together.

I know...We culd have simple selected those edges and use the Stretch command, but think of a drawing with complex geometry intersecting this rectangles that would make it hard to only select the edges we want to stretch.
And last but not least, we will try one more key. ENTER. Surprise! If we select a grip, we already said the the STRETCH command becomes active. But if we press ENTER after we have the grip selected, the command active will jump from STRETCH to MOVE, ROTATE, SCALE and MIRROR. ROTATE, SCALE and MIRROR will use the selected grip (or the last clicked before hiting ENTER) as a base point.
All these little tricks will save you a lot of time if you have them in mind. For those using AutoCAD Architecture see also this post for how to use the Grips of AECPolygons.

Show me more...

SketchUp: Teach it to your kids

A set of books to introduce SketchUp to the little ones.If you want your kids to become architects in the future or simply want them to do something more useful than playing shot'em'up games, maybe you should consider buying this set of books.
Author Bonnie Roskes has published a series of books to learn SketchUp, but they have the peculiarity of being intended for kids.
The series start with ModelMetricks Basics Series, a series of 4 books for the beginner kid. These are the 4 books of this first series:
1.- Home, Sweet Home, on this first book kids (age 8 to 15) can learn how to model different types of houses and color them. (Mac version of the Book here)
2.- Strange Buildings, probably the best of the whole series, kids can design, factories, towers, curved buildings in a very funny way.(Mac version of the Book here)
3.- Kids as Architects, on the third book kids take the role of the architect to design really surprisingly shaped buildings. (Mac version of the Book here)
4.- Go to your Room, the fourth book will allow children to design their own bedroom.( Mac version of the book here)

There is an intermediate and advanced series of the books as well, so if your kids love this first series you know what's the next present!

Show me more...

AutoCAD: Excessive Xref Scales

How to get rid of the long and annoying list of Xref scales.
Català - Castellano
One thing we noticed at work after installing AutoCAD Architecture 2008 was the extremely long list of scales when a file had Xrefs. We would get some scales like "1:20_XREF_XREF_XREF_XREF_XREF_XREF".
The manual procedure to get rid of them is to use the command SCALELISTEDIT, and remove all the scales that we didn´t want to see or use. This can be a pretty tedious process if it needs to be done on lot of files.
A way around is to create a script containing this line (COMMAND "-SCALELISTEDIT""R""Y""E") and batch run it in all the files we need. We will need a program like ScriptPro that will allow us to batch run the script in as many files as we want.
Good news for those who are planning to update to AutoCAD 2009, the issue has been partially solved by adding an option on the scale list. We can select to "hide Xref Scales", so we don't have to deal or see the long list of scales that are mostly useless for the most of us.

Show me more...