Showing posts with label Quantity Take-Off. Show all posts

#Revit 2012: Using the Create Parts feature for Quantity Take-Off

I am a bit disappointed with the new Create parts feature, let me tell you why.
Català - Castellano - Deutsch
I was very excited about the new Create Parts feature for Revit 2012. I thought it would simplify a lot the process of extracting quantities from a Revit model, by allowing to play with the different layers of a wall or floor (as other BIM packages like Allplan allow). yesterday I gave you the link to the video explaining the features.

My disappointment came today, when I realized that whatever you modify using the Create Parts feature, doesn't get reflected in a default Material Take Off Schedule. My first thought was the following:
"I tried it, it simply doesn't do anything. So as far as i understand it, the Create Parts feature is just a tool for representation. This to me is the wrong approach to go Autodesk. Revit (and BIM) is not just for representation, if you can't get accurate Quantity Take-Offs and thus accurate estimates from a model, what is the point of BIM?"
But then I thought, this can't be it, such a cool feature can't end on a mere representation of parts. So I dug deeper and found that you can use it for Quantity Take-Off.
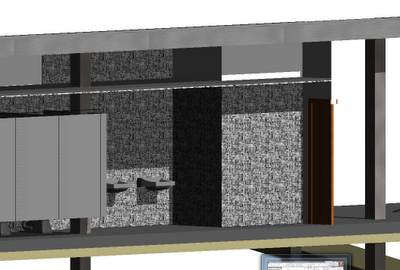


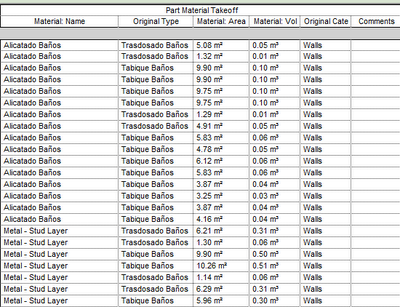
The key is that you need to create a Material Take-Off specific to list the parts, and you do it like this:
  1. Click View tab > Create panel > Schedule > Schedule/Quantities. Under Category, select “Part”
  2. Then add the categories you need for your take off, like Material: Name, Material: Area, Material: Volume, etc
It works, and it is great.

I am starting to realize as I read on this post, that REVIT CAN DO EVERYTUIN. Well not yet, but it is getting there, and this post and my chain OF thoughts should serve as an example of how sometimes we blame the Software (and the SOftware designers) for our own lack of expertise with it.

There is just one little BUT I haven't been able to solve. Using Parts combined with Groups doesn't seem to work well. After I created my Bathroom (the one on the first picture) I needed to copy that group all over the buidling since it repeats many times. When I used "Create Similar", the newly create Group, has all the parts reset to default. If you copy the group directly, it does work better, but in my example, some of the parts got reset as well to default.

Need to find out about this point if it is my fault or Revit's fault. So far it seems to be Revit's fault, since I am allowed to modify parts of elements that are inside groups without entering the edit gropu mode, and those changes are not reflected to other instances of the group. A little bug, hopefully it will be solved on Revit 2013.

BTW, I found the solution again via RevitWikiHelp, awesome database of solutions.


Show me more...

Revit: Using Building Pads Properly - Part II

A second not eon using Revit Building Pads the right way
Català - Castellano - Deutsch
On the previous post I talked about one of the issues I recurrently found when using Building Pads, their incorrect visual representation if you don't create them in a certain way. On this post I'd like to share a few points on how to use them properly to be able to get Cut and Fill counts, to be able to estimate the amount of Cubic Meters of Excavation of a project. On the documentation about Buiding Pads, there is information on how to create them and so on, but I think a few points are missing that are key to be able to use them the right way.

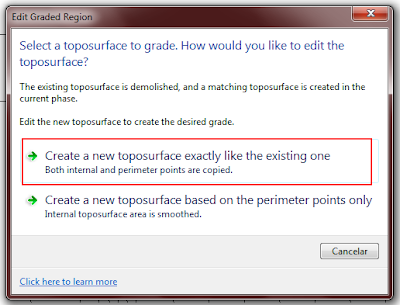
First of all, before creating any Building Pad, set the phase of the Topography to a Phase (I assume Existing would be the right one) and then set the phase of the view to the next one. Then, click on Graded Surface (on the massing & site Tab) select the topography, and on the dialog that appears, select the first option, see below, and simply accept the graded region like that pressing on the green "accept" symbol.


This will create an almost identical Topography to the existing one. If you don't do this first step, you will not get Cut and Fill counts when you create Building Pads. As I understand it, the count works as a comparison between one topography and the other, so without this step there is no topography to compare with.


At this point, you should have two identical surfaces, on on the Existing phase and one on the next one. I would hide the original topography at this point (Select it -> right click -> Hide in View -> Elements) so you know always that you are working with the new one that is the one you should modify.

All set until here. Now it is time to create the Building Pads. Very important point no to miss here. Revit allows you to create Building Pads by simply clicking on the Building Pad Button on the Massing & Site Tab. Don't do that. Be sure that first you select the Topography, then click on the Building Pad Button on the Massing & Site Tab. Otherwise, the Pad will be created, but sometimes (I haven't figured out why and how this happens) the Cut and Fill will not be reported on the Topography Schedule.


Create your Buidling Pad now, I am not going to describe this much because I think it is very simple and the documentation is good enough.

Next point, create a Topography Schedule if you don't have one (ideally your template should include one so you don't have to create one for each project). Then go to it and check what is being reported there. You will see probably three lines on the schedule, but you will not be able to know what is what. An important point to consider is Naming each Topography element differently. You should Name the existing Topo as "Existing" for instance, The copy as "Modified" or something like that and then each Topography created by adding the Building Pad with a different name that will allow you to identify it on the schedule. This is an example of a Schedule with the elements already named properly.


There is a Cut and Fill count on the "Modified" surface which I think comes from the slight difference between the two copies (the existing and modified topos) which might create a slight error on the total count, but my experience is that this amount is always negligible, compared to the total cut and fill counts obtained from the different topos related to the Building Pads.

Last two points to consider: First, creating a Buiding Pad, creates a Topography Element. It's important to understand that these are two separate but interrelated elements, if you delete one, the other will be deleted two (and the Modified topo will recover its previous shape).

Second, if you want to modify the Building Pad, you need to select the Building Pad Element (not the Topography Element) and then click on the "Edit Boundary" button that will appear on the ribbon. Unfortunately (as of Revit 2012) the Edit Boundary button does not appear if you are on a 3D view, so you will have to select the Pad from a Floor Plan view or similar. Since this might not be easy because all the elements that might show on that Floor plan view. I would select the Building Pad on any view where it is easy to select (I always have an Excavation 3D View with just Topos and Building Pads visible) deselect it, go to the Floor plan view and use the Select Previous function.

I think with this post and the previous one you can perfectly work with Topography and Building Pads and get accurate Cut and Fill quantities and the right visual representation. Hope this helps.

Show me more...

Revit: Using Building Pads Properly - Part I

There are a few things you need to consider when using Building Pads.
Català - Castellano - Deutsch
I've been using Revit Building Pads a lot recently to show the excavation needed for a project were are working on. The point was not only to show it visually, but also to use it to get the quantities for the excavation and so to be able to get an accurate budget for the works needed to build the underground levels of the building. This post deals with one of two different topics, the two topics are: one about some issues related with visual representation (on this post), the other about some issues related to the true BIM use of building pads, getting accurate quantity take-offs (on the next post).

Visual Issues: I realized that when using sloped building pads sometimes you get this sort of effect.


Getting this sort of "side wall" that shouldn't be there happens if you set the reference level of the Building Pad to be the top level and then slope it to go down to the level below.

If instead of that you place the Building Pad on the lower level and set it to go up to a higher elevation, then you will get the right effect, or to be accurate, a better visual effect. I think Building Pads can be still improved quite a lot.


Show me more...

Vico Software: BIM Master Series

Interested in BIM for Construction Management? The Vico BIM Master Series might be a good place to start.
Català - Castellano - Deutsch
I think out of all vendors pushing for BIM, Vico Software is the one with more knowledge and development in the area of Construction Management.

They have a great series of Webinars about Building Information Modeling (BIM) related to Construction (Scheduling, Estimations, Quantity Take-Offs, etc...). I will just post the links here for you to easily access them:

  • BIM 101: An introduction to BIM and some of its dimensions (3D, 4D, 5D)
  • BIM 201: How to use BIM during preconstruction, Integrated Project Delivery and some issues related to contracts between stakeholders
  • BIM 301: All about contracts related to BIM.
  • BIM 401: Scheduling with BIM and Flowline, learn about Location Breakdown Structure, Vico Control, etc.
  • BIM 501: Do you want to get estimates from your BIM model? Do you want to use the Quantity Take-Off from the BIM to plan and control production? This is your webinar then.
  • BIM 502: Learn about conceptual estimates and differnet modules of Vico Office.
  • BIM for Executies: All Managers need to know about BIM, costs, ROI, what BIM does, etc
A great way to learn about BIM for Construction. If you don't have time for the webinars, maybe you want to check the BIM Glossary the have posted here.

Show me more...

First Thoughts on Using Revit for Quantity Take-Off

Some thoughts, doubts, suggestions and questions after using Revit to help on a project quantity take-off process.
Català - Castellano - Deutsch

I've been working for the past month and half (really 3-4 weeks if we don't count the Christmas break) building a Revit model of a residential project in Barcelona. The model is being used in a pilot project to extract quantities, check for undefined elements and of course help visualize the building. The initial aim was to be able to do a complete quantity take-off from the Revit model, based on the drawings already finished (finished is a very optimistic term here...) by the architect.

I just wanted to share some thoughts I've been having the past weeks about the workflow and problems I encountered so if you are doing something similar either you ca give me some feedback or avoid doing the same mistakes as I have.

To put this in perspective, all this process has been done trying to follow certain Spanish (or Catalan) standards. I really don't know how you guys do estimations in other countries, what I explain here will be based on the way we do, or we try to do certain things.

Let me be more concise and put an example. The first time I showed someone the Schedule of Structural Beams, everything was WAWS and OOOH!. Soon I realized though, that the amazing automatic schedule that Revit was providing was:
A) Not showing the Steel Weight (which is the standard way to do Take-offs here when describing Steel Members and
B) Not splitting the Elements by Floor in the schedule (which is also very necessary in case some cost analysis needs to be run, to be able to say for instance "if we reduce one level, we would have this less steel")

The way I went around point B, was using Phases. I Created a Phase for each level and moved all Columns and Beams of each level to the corresponding Phase (20 minute work, no big deal). This way, I could visualise the schedule using Revit Phases, and could export the quantities for each level separately (showing the phase as a property in the schedule is still something I am trying to figure out how to do...any ideas?).

Point A was a bit trickier, so I will write a second post about it soon to not bore you all with so much text. I will also post soon about an Allplan 2011 demo I went recently, and my first thoughts on how Allplan related to Revit, what is better, what is worse, etc.

Show me more...