Control how your fractions are stacked in AutoCAD texts
Català - Castellano - Deutsch
Lazy Drafter just published a quick tip on how to format your fractions in AutoCAD. One of this little tips that in case you need to use it is really useful. Sometimes this little things are the ones that make us waste a lot of time because we do not know how to do it, si memorise this tip for the day you work with fractions in AutoCAD texts.
When typing fractions on MText, AutoCAD will rpompt you asking if you want to "Stack" the Fraction. If you say yes, then you will be able to select that fraction and modify the way it is Stacked. To do this, select the fraction, right click on it and Select "Stacking properties". See below.
With the different options you will be able to change the format of the fractions.
Via Lazy Drafter.
Show me more...
Showing posts with label Text. Show all posts
Photoshop: Access a Wide Range of Text Editing Tools
There are many more options to edit Text than you think in Photoshop. You just need to know how to access them.
Català - Castellano - Deutsch
This is one of this tips that some might think "duh!", so I excuse myself in advance for my lack of Photoshop proficiency. But since this website is as much a way for me to share what I learn, as a way to store tips for when I need them and I can't remember here it goes.
When you type texts in Photoshop, the default options available are pretty limited, all contained on the upper toolbar that looks like this (the screenshot is from version CS4).
But if you click on the button on the far right of this toolbar, you will be able to access a full set of tools to edit your texts much more complete that the default text toolbar. Alternatively, this Character Window, can be accessed through Window --> Character (duh again, I know...). On this window you will be able to use Sub- and Superindex characters, use Title Fonts, play with the font spacing etc.
Maybe for many this is the kind of tip that you wonder "how could this guy not know about that?". I know it is a very basic tip, but it is a tip anyway.
Show me more...
AutoCAD: Using Annotative Scale for Texts
Annotative Scale Texts are an awesome way to speed the annotation process when a drawing needs to be shown in different Scales.
Català - Castellano - Deutsch
Since AutoCAD 2008, there is a property for several entities called Annotative Scale. What this property allows us is to show the objects differently according to the Active Annotation Scale. This is specially useful for Text notes.
Imagine a floor plan of a project shown at 1:200 scale with a lot of descriptive notes. The notes you have will be the right size to be printed at 1:200. But you might want to use the same drawing to show an enlarged plan of certain portion of the project. The problem is that if you just blow it up, the notes will be twice the size that shows "properly" when printed. Annotation Scale will help you solve this.
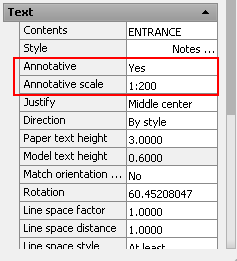
If you select the text and go to the properties Tab, there is a property called "Annotative". By default this is set to NO. Change it to YES to turn the Text into an Annotative one. There is a system variable, ANNOAUTOSCALE, that controls if new annotation Scales are added automatically or not, it has a lot of values, from -4 to 4, so see here what each value does.
In general, it is not recommended to have the ANNOAUTOSCALE set to automatically add annotation scales to all the objects, since that would increase the file size quite a lot. Alternatively, set the annotation Scale of the drawing by selecting it on the lower right side of the screen.
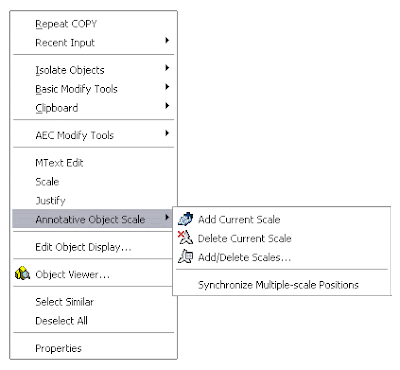
Then, you can simply select those objects you want to add new annotative scales too, right click --> Add Current Scale.
One more thing you can do is set different orientation for each annotative scale. This is very useful, because you might have an overall plan aligned to the World UCS (or North on top, or whatever) and then enlarged plans aligned according to the portion of the building/project you are focusing on. If you rotate the Text using the ROTATE command, it will rotate all its Annotative instances. If alternatively, you select the text, and on the properties tab you enter a new rotation, the new orientation will apply only to the current Annotative Scale. See the following image.
The 1:200 text is aligned in one direction, while the 1:100 text (the smaller one) is aligned according to the enlarged plan orientation. I am still trying to figure out how can I in AutoCAD Architecture, do the same for Space Tags. Will definetily post it whenever I find the way.
Annotative Scale applies to other AutoCAD objects such as Blocks, I will deal with that in a different post soon. Stay tuned
Show me more...
Labels:
AutoCAD,
System Variables,
Text
AutoCAD: Switch Text Between Uppercase and Lowercase
Did you forget the Caps Lock on while typing a long text in AutoCAD? Don't delete it, do this.
Català - Castellano
Some people type texts staring at the keyboard instead of at the screen. That together with the fact that sometimes we forget the Caps Lock on, means that we end up deleting and retyping some texts. No need to retype anymore.
If we select the text we want to turn from uppercase to lowercase and press together CTRL + SHIFT + L, it will automatically become lowercase.
The system works too on the other way. If we press CTRL + SHIFT + U, the selected text will turn to uppercase.
Show me more...
AutoCAD: Text Express tools
One of the treasure of latest AutoCad versions are the express tools.
Català - Castellano
In some versions of AutoCAD, you have to check the box that asks you to install them when installing the program, but believe me, they are worth it. Simpler ways to do things com with the express tools.
Lets analize those Express tools that helps us improve the way we treat Text.
Show me more...
Català - Castellano
In some versions of AutoCAD, you have to check the box that asks you to install them when installing the program, but believe me, they are worth it. Simpler ways to do things com with the express tools.
Lets analize those Express tools that helps us improve the way we treat Text.
We have:
ARCTEXT (Express - Text- Arc aligned Text)
With this one we can place a Text following the path marked by an ARC. We have several options on how to do it to select from the ArcAligned Text Workshop dialog box.
We can select to justify text on either side or center of the arc or to fit it along the length o the ARC. We can place it on the outer part of the Arc or the inner one, Upside down, reverse other, etc. Regetfully this tools don't seem to suport a curved path created by a polyline. Just as a quick example of what you would get check this image.
TEXTFIT ( Express - Text - Text Fit)
We can take any text (not multiline text) and shrink it or stretch it to fit in any given dimension. See that this is basically a fastest and more visual way to play with the widht factor of the text.
See this three texts, each of them shrunk to fit in different lentgh but keeping the same text height.
TXT2MTXT
We can convert any TEXT or DTEXT into MTEXT.
The Upper text was transformed into the lower Mtext with the TXT2MTXT command.
The remaining Express Tools for Text I don´t really find them that Useful or I haven´t been using them so I´ll simply list them here. They are:
TEXTMASK Masks entities from behind text
TEXTUNMASK Remove mask from text
TJUST Changes a text object's justification without changing its position. Works with text, mtext, and attribute definition objects.
TORIENT Aligns text, mtext and block attribute objects to new orientation
TSCALE Scales text, mtext, attributes and attribute definitions.
Show me more...
Labels:
AutoCAD,
Express Tools,
Text
Subscribe to:
Posts (Atom)