Showing posts with label AutoCAD Arch. Show all posts

AutoCAD: Layout Preview Thumbnails

Preview all the layouts in AutoCAD for easier use.
Show me more...

AutoCAD Architecture: Getting back the full right click context menu

Sometimes the right click menu with all the nice options of AutoCAD Architecture doesn't show. Get it back!
Català - Castellano - Deutsch
For some reason (unknown to me till the date) the right click menu with all the nice options that AutoCAD Architecture [ACA]has doesn't show in full when I start the program. Instead I sometimes get this simplified version of the menu.


This context menu is quite useless, since some of the most uselful tools are not there (like the AEC Modify Tools, Select Similar, Open Xref, etc).

To get the full menu if you are having this problem, simply run one of the AEC specific commands like AECPOLYGON. This will load all the AEC tools and your right click menu will be back to "normal" with all its features like in the image below.


Show me more...

Most Commonly used Design Software

See which software packages are being used by more people
Català - Castellano - Deutsch
After analyzing part of the questionnaires of my master thesis I created this table showing the answers to the question "Which software package do you or your colleagues use regularly?" There where a total of 93 completed questionnaires from several locations and from a varied type of stakeholders, so the sample can be considered quite representative. I was surprised though by the high percentage of respondents who answered that they or their colleagues used Revit regularly. Here maybe is where the sample has some flaws, and people applying BIM concepts were more prone to answer the questionnaires than those who don't. Hard to guess. In any case, here is the table, take your own conclusions.


Show me more...

Installing Express Tools in AutoCAD Architecture 2011

Check that you are installing the express tools before running your ACA 2011 installation. They are important.
Català - Castellano - Deutsch
We have seen in several posts how useful Express Tools are (both in AutoCAD and AutoCAD Architecture). It is important to know that in some versions, installing these tools is not set as default on the installation programs. So let's go quickly into how to install these awesome tools from the very beginning.

This post applies to AutoCAD Architecture 2011 which I had to reinstall in one computer recently. But I assume for other versions it might be quite similar. When you run the set up program and after entering you serial number and product key, you'll come to the following screen.


Press on configure and you will be able to modify some of the installation parameters. On the first screen you'll choose Network or Stand-Alone license, on the second one is where you'll have to choose to select the express tools. See below.


First you need to press "Custom" and then browse till you see the express tools on the list and select them to be installed. On the image above you see the default status, where the Express Tools would not be installed.

That's it, now your AutoCAD Architecture 2011 Installation will include the Express Tools


Show me more...

AutoCAD or AutoCAD Architecture??

How many of you are still using plain AutoCAD? Try to move to AutoCAD Architecture at least, you'll work much much faster.
Català - Castellano - Deutsch
I've been recently struggling with the experience of working with plain AutoCAD after 3 years of working with AutoCAD Architecture in a professional environment. It is hard for me to understand (other than pure commercial strategy) why plain AutoCAD still exists.It might sound weird if you are working with plain AutoCAD, but once you've tried AutoCAD Architecture, plain AutoCAD feels like someone has cut one of your arms.

The tools I miss the most are the AEC Modify Tools (see them in this post) accessible via right click context menu. Other functions that are not available and that really speed up the work are the "Select Similar" and "Add selected". Select Similar allows us to select all similar objects 8same type, layer,etc) directly from the right click context menu too. And Add Selected allows us to add an object that is the same as one selected, saving tons of time on remembering commands.

These last two functions are available in AutoCAD if you have a Subscription Advantage Pack. Here is the Autodesk page that showcases these functions. But you should know, and this is the main reason I write this post, that these functions are available in AutoCAD Architecture, so to mee, no point paying for some functions, when you could have them all.

Also, considering that the transfer to BIM will happen sooner or later, consider next time you want to upgrade , to go for the AutoCAD Revit Architecture Suite. This one contains AutoCAD + AutoCAD Architecture + Revit Architecture.

So just to wrap up and up to my own curiosity to know what my readers use every day. Could you answer this poll? What program do you use every day at work?


Thanks!


Show me more...

AutoCAD Architecture: Recover the Menus Part II

Autodesk keeps making our lives more difficult. Fortunately, there is a way around most of the time...
Català - Castellano - Deutsch
I wrote the other day about how to ditch the ribbon and recover the standard Menu Bar. Well, that solution worked for my AutoCAD 2010 at work. Unfortunately at home I installed the AutoCAD Architecture 2010 Student Version (I am a student too). When I tried to follow the steps exposed on that previous post, I got a message saying, "No Menus are Defined". Apparently, Autodesk is trying to force the use of the Ribbon, so is supplying copies of AutoCAD "menu naked"
The partial solution to this problem was found via the Autodesk Discussion Group. If you download this Zip File and follow the instructions described in it, you will get some of the menus back. Although I think I am still missing some of them...With this solution I got the Menus: File, Edit, View, Insert, Format, Window and Design, is that all??


Show me more...

Mastering AutoCAD Architecture

Become a Pro of AutoCAD Architecture with this book.
Català - Castellano - Deutsch
Jason left our office last week and he gave me his "Mastering AutoCAD Architecture Book" by Paul F. Aubin as a farewell present. I've been browsing through it and it seems I am gonna get some nice tips to post here.
The book is divided in 18 Chapters plus several Appendix with extra exercises. The language is clear and concise and it seems to go to the point right away. Tips like "in case of doubt, right click" can give you an idea of the type of plain and direct language used. I've got the edition for the 2008 version of ACA "Mastering AutoCAD Architecture 2008". For those looking for the latest version of the book follow the links below.


or or


Show me more...

Select Similar Objects / Blocks / Components

Learn how to select all the instances of a component
Català - Castellano - Deutsch
I post often how to find ways to mimic behavior of different programs. We get used to certain tricks that make us work fast and then we miss those things when using a different software.
This is the case of the AutoCAD Architecture function "Select Similar". What this does is to select all instances of an object with the same properties. For instance, if we select a wall, right click and choose "select similar" in the context menu, all the walls of the same style on the objects layer will be selected. The same happens with any object sharing properties and layer with the selected objects.


So how do we do this in SketchUp? There is actually not one method that does all this, but there are several ways to achieve a similar result. If what we want is to select all the instances of a component (the equivalent to Blocks in SketchUp) we need to open the component browser (Window --> Components), then right click the thumbnail of the component we want to select and choose Select Instances (we already went through this on a previous post about How to Replace all instances of a Component).
If what we want is to select all the objects on a Layer, we can simply select one object that lays on that layer, right click it and go to Select --> All on same Layer.

These tricks on SketchUp don't do exaclty the same as the very useful "select similar" command of AutoCAD Architecture and the other AEC versions of AutoCAD, but they are close enough.

Show me more...

AutoCAD Architecture: AEC Modify Tools

This awesome Tools make editing 2D objects really quick. It is like having Boolean Tools for 2D.
Català - Castellano - Deutsch
AutoCAD Architecture has some great tools that help working way faster than with plain AutoCAD. Some of them are logically specific to Architecture, but others like the AEC Modify Tools I think should be standard to any AutoCAD version. They are actually like having Boolean operators for 2D Objects. See this quick video to understand what they do.


Sorry for some of the Tools Selection beeing cut on the video...I am still working on getting this video recording figured out. The order of the tools used is the one on this image. I skipped the ones on the bottom, after the spacer, since I don't find them very useful.


Show me more...

AutoCAD Architecture: Editing AEC Polygons

AEC Polygons can be very quickly edited using grips. It's a zillion times faster than editing polylines.
Català - Castellano - Deutsch
Somemonths back I wrote a post about Working with AEC Polygons in AutoCAD Architecture.
I thought I would add a video to that post, but since it is old and I rather have all of you subscribers seeing the video I decided to create a new post and link both of them.
So here is the video, it basically shows how you can edit the AEC Polygons by simply clicking on the grips and pressing CTRL to toggle between different editing modes.


Other editing tools, the AEC Modify Tools will be described in a post soon.

Show me more...

AutoCAD Architecture: Irregular Walls - Endcap Tutorial

Learn how to use Endcaps. They are very useful when you want your wall openings to be more than just a square.
Català - Castellano
We have been designing a "not very modern" type of building (to say something) in the office. One of the things we have to deal with is the fact that this Gothic-Art Decoish building will have heavy pilasters on the façade to resemble some sort of old architecture.
In previous phases of the project we had been just using regular walls and adding the extra depth of the pilasters with an AEC polygon. Since we were printing with both wall boundary and wall hatch in black, that worked good enough for representation, but it was a pain in the ass when editing the wall, moving windows,etc.
On the current phase, we are reverting to a different kind of representation following more the standards set in the office. This means black boundry line + grey hatch for the wall. The problem is that if we use a regular wall and we add a AEC Polygon to the outside of it to get the extra thickness needed, we will see the line separating the wall and the AECP, and we do not want that.
The solution I found for this problem is to use the Wall Endcaps. But let´s start first with a picture of what we want to achieve.


As you see, we have a regular wall and some windows, but we want the space between the windows (what is the name in English for that?) to have the shape of the white line. To do that, we first increase the thickness of the wall to reach the thicker point necessary. THen we select the wall, right mouse click and select Endcaps --> Edit in Place. We will access the endcap edit mode. Endcaps work exactly as AEC Polygons, so take a look at this post on how to edit AEC Polygons. In the image below you can see the endcap after being edited in the Endcap Edit in Place Mode.


But when we exit, we see that the Window sill is showing like floating (this is because the window sill is showing the actual thickness of the wall). We have to edit the window style to fix this. Right click the window --> Edit window Style (if you just want to edit one window of this style you can pick "Edit Object Display")


In this dialog, we have to edit the Sill Plan. Click on the box to the right of the Sill Plan and go to Edit Display Properties on the upper right. In the following dialog we need to click the "other" tab. Here is where we will set how much we want the Sill to be recessed from the wall edge to show the way we want it. In our example we need to set the B dimension to -0.10 (negative will make the sill be recessed)


The final result is the desired. See the image below for the final wall with its irregular shape and the sill aligned to where we wanted.


Show me more...

AutoCAD: Things that CTRL can do for you

Following the series that explores the benefits of certain keys. This time CTRL will make your life easier.
Català - Castellano
Second post on the series "things that a KEY can do for you". The first one was about the SHIFT key. In this one we will see how CTRL can help us work faster. Several processes can be sped up using the CTRL key smartly:
  • If we click on a Grip of an object we can move it, stretch it, etc. If we press CTRL we will copy it.
  • Pressing CTRL on AutoCAD Architecture (ACA) when we are drawing a wall, will toggle the justification line from left to right.
  • Also on ACA, when moving a grip of an AEC polygon, pressing CTRL will cycle through the different options. (see this post for more details)
  • On 3D objects, pressing CTRL will allow us to select subobjects (i.e faces)
  • On 3D objects, if we are editing faces through Grips, CTRL will togle between the different editing methods.
There are other functions CTRL performs in AutoCAD or ACA, but these are the ones I find the most useful to increase your work speed. If you know of any other, let me know!

Show me more...

AutoCAD Architecture: Hiding 2D objects (actually obscuring them)

Trying to find a way to hide single objects I came across a way to obscure them.
Català - Castellano
Someone told me today at work that Microstation has an option where you can hide objects regardless of their layer. I really don't know if that is true (haven't used Microstation for almost two years) but I was asked to find a similar command in AutoCAD. Be aware, I wasn´t successful.
But every failure has a part of learning, in the process, I discovered the AEC Tool: Obscure. You can access it by selecting geometry -- Right click -- AEC Tools -- Obscure. Or you can directly type the LINEWORKOBSCURE command.
See the two pictures below to appreciate what this command does.
On the image above we want to hide the withe and red geometry behind te white geometry. The process is simple. We select the geometry we want to show as hidden (in this case the white and red rectangles), right click -- AEC Modify Tools -- Obscure. Then we will be asked to select the geometry that is going to create the obscuring boundary. We select the two blue rectangles. Done, see the result below.
See how all the "hidden" geometry becomes dotted lines, and how even the solid hatch filing the central rectangle is "hidden" behind the blue rectangle. I say "hidden" because there is nothing actually hidden here, what ACA does is break the original geomtrey using the boundaries we gave it, and change the geometry inside those boundaries to a layer with hidden line properties.
It ia a useful command, but don't forget that this is pure 2D. I am still tring to figure out a way to configure the properties of this hidden geometry layer. By default the layer is called Aec-Detail-Hidden, but I know that this can be modified (as wellas the layer properties) because in my company when using this command the hidden geometry comes in one of our standard hidden layers. Will investigate a bit more and post the solution if I find it. Or do you knowhow to do it?!?

Show me more...

AutoCAD: Things that SHIFT can do for you

Do you know that the SHIFT Key can make your life much simpler?
Català - Castellano - Deutsch
After many months finding tips about how to work smarter and easier, I realized that some Keys in the keyboard really make a difference on your work speed. That is the reason why I want to start a series of posts explaining what some of these keys can do for you, to improve the way you work.
We will start with the SHIFT Key, since it is the one that so far has proven to me more useful. This is a quick list of how SHIFT will make you work faster with AutoCAD:
  • SHIFT while drawing a line will lock the perpendicular inference. It is like a temporary activation of the ORTHO mode. If you press SHIFT, a tooltip with similar to the macro Icon of digital cameras appear to show you that ORTHO mode is temporary active.
  • When using FILLET or CHAMFER, pressing SHIFT while selecting the second entity will override the fillet radius or the chamfer distances with a value of 0. Very useful if you want to keep certain radius or chamfer distance but once in a while you need a sharp corner.
  • When Selecting Grips of an object, holding SHIFT will allow us to select multiple grips (deeply explained here).
  • When we are selecting objects, pressing SHIFT will allow us to deselect any of them.
  • When using TRIM or EXTEND, pressing SHIFT will toggle between one command and the other (i.e. if you typed TRIM and press SHIFT and select the object, it will extend instead of trim).
  • For object snap tracking, object points are automatically acquired. If you press SHIFT you will avoid acquiring points for object snap tracking.
  • SHIFT + SPACEBAR: cycle through selection peviews If selection preview is turned on, you can cycle through the objects by rolling over the object on top to highlight it, and pressing and holding SHIFT and then pressing SPACEBAR continuously. When the required object is highlighted, left-click to select it. If selection preview is turned off, hold down SHIFT + SPACEBAR and click to cycle through these objects, one after the other, until the one you want is selected. Press ESC to turn off cycling.
  • SHIFT + RIGHT MOUSE CLICK: Will call the Osnap contextual menu (see more here).
  • SHIFT + TAB: When working with Dynamic dimensions, it cycles backward through all editable dimensions (TAB only will cycle forward)
  • On AutoCAD Architecture, when we draw Walls, SHIFT allows us to choose the Justification Line. Once we started drawind the wall, by prssing SHIFT we will cycle throught the different possibilities (left, center or right)
I have to confess that 2 or 3 of these tips I never use them, but some others have become so fundamental to my workflow, that is hard to imagine how I worked without them for so long.
kick it on CadKicks.com

Show me more...

AutoCAD Architecure: Forget about Associative Hatch Patterns

For a long time I struggled to remember to check the box "Associative" when creating Hatch Patterns. Now I know I don't need to do this anymore.

For a long time I struggled to remember to check the box "Associative" when creating hatch patterns. Without that Box checked it was really hard to modify any existing hatch pattern. But even creating an associative pattern didn't make it very flexible to work with them. A lot of times the boundary bothers us so we end up erasing it and doing that we loose the associativity of the pattern.
AutoCAD Architecture has some features that make hatch associativity something from the past. When we have a Hatch Pattern, we can select it and right click on it. We will get the contextual menu shown on the left side of this post.
The beauty of it is that if we click on generate boundary, an AEC polygon will be generated. We can then modify that polygon to fit our new hatch needs and after that we simply select the Hatch - Right Click - Set Boundary - And we will select the modified polygon. We will we prompt to decide if we want to erase the polygon or not, which I personally recommend say yes, since it is so easy to recreate them.
But this is not all, AutoCAD Architecture has another set of tools that will improve our work flow, the AEC Modify Tools. These tools will allow us to easily modify our hatch by Merging it with other entities, Subtracting parts of it or dividing it in two. I will write a post soon with more details about the AEC Modify Tools.
For those Using classic AutoCAD classic these features are not available. You can Recreate the Boundary of a Hatch by double clicking it and selecting "Recreate Boundary". I don´t think there is anything similar to the AEC Modify tools in the classic version of AutoCAD.
If you are in the AEC industry I seriously encourage you to jump ASAP to AutoCAD Architecture whenever you need to update your CAD software. It boosts the work flow of your employees many times. To learn all the features specific to AutoCAD Architecture you might want to buy this book.

Show me more...

AutoCAD Architecture: Tutorial on Wall Cleanup Priority

Which wall style do you want to prevail over the others?
Català - Castellano
An important parameter to be able to control when working with walls in AutoCAD Architecture or ADT is the Wall Cleanup Priority. What this parameter controls is basically which wall, or which elements of a wall are going to be shown on top of others when two walls meet.
To easily understand what I mean lets see a quick example. We create a wall style that represents the Structural walls of our project with a solid fill, very simple. Then we intersect that wall with another one, we´ll use the standard style. This is the result we might get:What we actually want though is for the structural wall to be always visible since it makes no sense that a non structural wall breaks a structural one. We need to edit the wall styles. To do that we can select one of the walls, right click and go to Edit Wall Style. There we have to go to the Components Tab and be sure that the Priority of the Structural wall is lower than the priority of the Standard Wal
Once we´ve set the proper wall cleanup priorities for both wall styles, we will get the result shown below. Very easy to use.

Show me more...

AutoCAD: Missing Dialog Boxes

If you can't find a dialog box that is supposed to appear here you'll find the solution.
Català - Castellano
Recently my company upgraded from Autodesk Architectural Desktop 2006 to AutoCAD Architecture 2008. We found the problem that in any computer we ran AutoCAD architecture, the dialog Boxes were missing when running commands such as HATCH or calling the Layer Manager.
The problem seems to come from some sort of hardware issue. We couldn't figure out the way to solve it till we found out that the dialog boxes were not missing, but far away on the left side (outside the screen resolution area).
The solution we found might not fight the source of the problem, but it definitively worked as a solution for us.
After running a command that should call a dialog box like Hatch, we press together Alt+Space+Enter. Then press the right arrow and keep pressing it until, surprise, the dialog box appeared from the left side of the screen.
This is a basic Windows procedure, If you click Alt+Space in any explorer window you will see a dialog open with the options Restore, Move, Size, Minimize, Maximize and Close. The same happens with the Dialog Boxes in AutoCAD, but the only options in most of them are Move and Close. Since Move is the default one, by pressing Alt+Space+Enter we will have selected to move the dialog box without the need to see it. Then we will use the arrows to move it till it appears on scree.

Show me more...

AutoCAD Architecture: Working with AEC Polygons

Forget about Polylines, AutoCAD Architecture has a much better entity.Forget about Polylines, AutoCAD Architecture has a much better entity than polylines, the AEC polygon (type "AECpolygon").
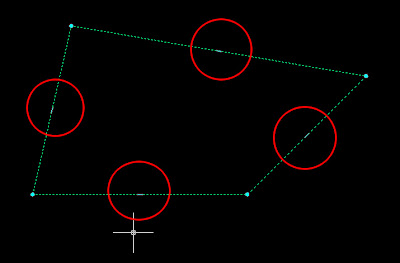
Once you draw one and select it you will realize that in opose of polylines that only have grips on their vertexes, the AEC polygons, have grips both in vertexes and middlepoint of each edge.


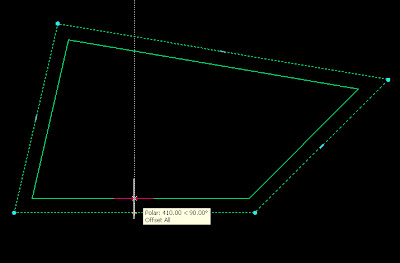
This is the first feature that makes them much better to work with than simple polylines. If we click those grips, we will be able to move that edge parallel to its original position, extending th adjacent edge to fit with the new position. See the picture.
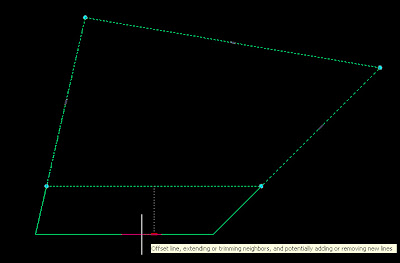
But this is not the only thing we will be able to do. Click Ctrl and instead of ofsetting the edge you will be adding a new vertex.
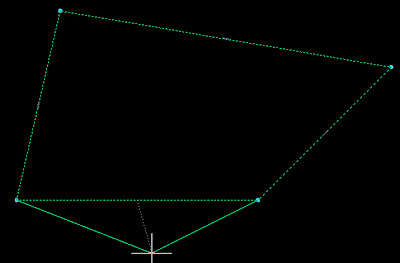
Click Ctrl again and you wil transform that edge into an arc.


And for a last useful trick, press Ctrl again and you will get to offset all the edgs at a time.


Similar great features will happen if you click contr after selecting one of the vertex grips instead of the egde ones.

- Click the grip to move the vertex

- Press Ctrl once to remove the vertex

- Press Ctrl twice to Offset both edegs that intersect on that vertex.

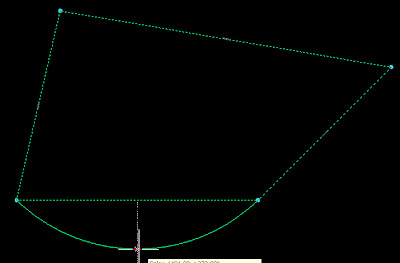
As a last cool feature of the AEC polygons try to select the middle grip og an AEC polygon with an arc segment. You will also have several options:

- Click the grip to offset the arc segment (it might add some segments to the AEC polygon)

- Press Control Once and you´ll be able to modify the radius of the arc segment

- Press Ctrl again and you will straighten the segment

- Press Ctrl Again and you will add a vertex (and two arc segments)

- Press Ctrl again and you will offset all the faces of the AEC polygon.

I would say that, combined with the AEC modify tools, there is no reason to keep using the polylines.


Show me more...

ADT 2006: Rotate Tags

How do you rotate all tags at once?One of the cool features of Autodesk Architectural Desktop 2006 is the use of spaces and tags anchored to them. A space is an ADT entity, not existing in AutoCAD. With spaces and their tags, we can easily show the areas of a residential Unit, a retail development etc. When we add a tag to the space that is intended to show the area of that space, the tag will update if the area of the space change.
anyways, this post doesn´t intend to explain what tags and spaces are. It's just a post to share what I discovered lately. For a long time I though I couldn´t rotate tags any other way than selecting them one by one and rotating them. That was really painful in big projects. Yesterday I discover that in the properties tab, if we click in the box that says¨"Anchor" there is a field that says "rotation". So if we select a bunch of tags get to the properties tab and click on anchor we will be able to rotate all the tags at once keeping the where they are.

Select tags -- Go to property palette -- click anchor -- change rotation angle.
UPDATE: This is an old post. Can you tell us in the comments if the trick still works? Thanks!

Show me more...