Do you want to load a new Plugin without restarting SketchUp? Alex Schreyer has a Plugin for that.
Català - Castellano - Deutsch
Sometimes we want to try new Plugins we just downloaded without the "hassle" of closing SketchUp and opening it againg. Alex Schreyer, has written a Ruby Script that allows us to do that.
PLUGIN LOADER (as_pluginloader.rb) adds a submenu to the plugin menu that allows us to reload the entire Plugins folder or to pick one by one which Plugins we want to load.
You can download the plugin using the above link or go to Alex Schreyer Website were he keeps updating it with the latest release.
Show me more...
Showing posts with label Downloads. Show all posts
SketchUp Plugins: Color Terrain to Show Terrain Slope or Height
Need to see which are the high points of your terrain or which areas are too steep to build on? Use thses next two plugins to quickly see that.
Català - Castellano - Deutsch
Chris Fullmer published some time ago a couple of plugins to Color Models according to the Height or the Angle of the faces. This turns to be very useful in many situations. I came across these Plugins because we were planning a new development and needed to easily visualize in plan which where the high points and were we had too steep areas.
COLOR BY Z (clf_color_by_z): Colors faces according to their height (z value). you can pick which color you want to be the one for the highest point, and which one you want for the lowest point. It will create a gradient from one color to the other. See the images below.
COLOR BY SLOPE (clf_color_by_slope): Does the same trick, but coloring the faces according to its angle (slope).
See these next two Plan shots to understand how this could be useful to you to identify potentially bad areas to build or to simply glimpse the height changes of your terrain in plan.
Show me more...
SketchUp Plugins: Turn Lines into Tubes / Cylinders
Turn lines into cylinders with one of these two Plugins.
Català - Castellano - Deutsch
There might be several reasons why you want to turn your lines into cylinders/tubes. You might just want to be able to render a bunch of lines in your model. In that case, you need to turn them into cylinders or else they will not appear on renderings. You have two plugins to do this.
LINES TO TUBES (lines2tubes.rb): by Didier. Formerly known as LINE TO CYLINDERS (lin2cyl.rb)Will turn a bunch of lines, arcs, circles, curves, etc into cylinders of a given diameter. It doesn't matter if they are connected, just select the linework, go to Tools --> "Convert circles, arcs, curves, lines to cylinders". Download it here.The advantage is that you can simply select all the linework and convert it to pipes, the disadvantage is that all the corners between different entities will not have Follow Me connections, just pure Push Pull.
TUBE ALONG PATH (TubeAlongPath.rb): by TIG. Does the same operation but only for connected paths. It has the advantage of automatically creating follow me operations when reaching corners of the path. The disadvantage is that only connected paths can be created at once. To use it select the lines that create the path, go to Plugins --> Tube Along Path. Download it here.
Show me more...
SketchUp Plugins: Fill the Section Cut With a Face
Fill the section cut with a face for better display with the sectioncutface plugin
Català - Castellano - Deutsch
TIG has published an updated version of his SectionCutFace.rb plugin (version 2.2). THis plugin adds a face to fill the section created with the standard SketchUp tool "Section Plane".
For those newbies who don't know "Section Plane", it is a standard tool (under the Tools menu --> Section Plane) that allows you to automatically cut a section trough your model. See it graphically.
What TIG's plugins adds is the feature to select the section plane, right click it and select Add Section-Cut Face. This (if you have a clean model) will generate the face for the section cut, like in the image below.
The Plugin has a dialog where you can play with several of the options, and that looks like this.
To be able to run the plugin, you need to have the section plane active. To do so go to the Menu View --> Section Planes (it has to be checked so you see it on the screen so you can right click on it).
You can Download the Plugin here.
If you are new to SketchUp chek here to know how to Install SketchUp Plugins
Show me more...
SketchUp Plugins: Delete Coplanar Edges
Easily delete all those unnecessary coplanar edges with this Plugin. It will reduce de size of your model drastically.
Català - Castellano - Deutsch
I've been doing a lot of SketchUp modeling at work, that's the reason why you see here more posts about SU Plugins than usual. Anyways, I needed to clean part of my model that had a lot of unnecessary edges separating coplanar faces. And I though, there must be a Plugin for that. I wasn't wrong.
The deletecoplanaredges.rb Plugin, easily erase those unnecessary edges, turning a bunch of coplanar faces into a single one. See this quick example.
We want to remove all those lines that play no role anymore other than increasing the file size. Once you have the plugin installed, simply select all the geometry you want to clean up, right click on it and on the context menu select "Delete Coplanar Edges.
The result will be like the image below, a single face made of all the previous coplanar faces.
You can download the Plugin here.
Show me more...
Labels:
Downloads,
File Clean Up,
Plugins,
SketchUp
SketchUp Plugins: Round Corners
Need to turn Sharp corners into round ones? There is a Plugin for that too. A new great Job by Fredo6.
Català - Castellano - Deutsch
The rounding of corners is usually needed when we create our models. Fredo6 has made this awesome Plugin, now on its 2.0 version that just rocks! See the video below.
To download the Plugin go to the original Post by Fredo6. Remember that this operation will increase very quickly the number of faces in your model, so use it wisely.
Show me more...
SketchUp Plugins: Engineering Toolbox
Do you need beams, pipes, HVAC ducts, elbows, etc? The Engineering ToolBox Allows you to insert them to SketchUp with the right dimenisons.
Català - Castellano - Deutsch
EngineeringToolBox.rb is a SktchUp Plugin to easily insert standard engineering elements to a SketchUp model. You can find more information on the plugin's website, but basically what you need to know is that this plugin will allow you to insert Pipes, elbows, lumber elements, flanges, metal beams and columns icluding standard IPE (not IPN unfortunately, which would be the most time consuming to model actually), HEB, etc, stairs, channels, hollow sections, and more. To me, specially useful are the standard Beam sections, no more referring to the standard dimensions manual to model these elements.
The Plugin works as a web dialog. Once installed, simply go to Plugins --> Engineering ToolBox. From there a web dialog will open (you need to have an internet connection) and you will access the plugin's website where you will be able to choose the elements you want to add to your model.
Download it here and give it a try, it is a trully time saver.
via SketchUp Ireland
Show me more...
SketchUp Plugins: Google's Ruby Scripts
Google has a set of Plugins (ruby Scripts) on the SU website
Català - Castellano - Deutsch
Google has a set of Plugins for SketchUp that can be downloaded directly from their website here.
The list includes:
Most of them are for very basic operations, but once you have them you'll miss them if you don't have them anymore, so keep the link for when you transfer to a new workstation.
Show me more...
Català - Castellano - Deutsch
Google has a set of Plugins for SketchUp that can be downloaded directly from their website here.
The list includes:
- Bezier: to create Bezier curves
- Rotated Rectangle: for creating rotated rectangles.
- Shapes: to create and editing a number of parametric shapes.
- Window Maker: for creating parametric double-hung and slider windows. (different than the Windowizer Plugin)
- Grids: to create parametric grids.
Onion Dome: to create onion domes. - Simplify Contours: it simplifies the geometry, making it easier to work with.
Most of them are for very basic operations, but once you have them you'll miss them if you don't have them anymore, so keep the link for when you transfer to a new workstation.
Show me more...
SketchUp Plugins: Loft
The Loft operation is very common in 3D softwares. Now SketchUp has a Plugin to do it too.
Català - Castellano - Deutsch
Chris Fullmer has programmed a Ruby Script to be able to do the common Loft Operation (creating a surface from too Curves). It is not yet a final release of the Plugin and it is not 100% precise, but it does the trick and it is very useful and easy to use.
For those who don't know what a Loft operation is, check this couple of images and see how the surfaces on the right were created from the profiles on the left.
Chris has published a video at SCF where you can see the Plugin beeing used. The Link also works to download the Plugin (you need to be registered).
Show me more...
AutoCAD Weekly Block #08: Cobblestone Pattern
Download this block and learn about the SUPERHATCH command
Català - Castellano - Deutsch
This week's Block is the first that is not a dynamic one. The reason for that is that I remembered I had not talked in here about the SUPERHATCH command. As you will see, the SUPERHATCH command allows you to hatch an area with any custom made hatch.
Why is it in the weekly block section? Well the way SUPERHATCH works involves Blocks much more than it involves hatches (it actually does not involve hatch patterns at all.
The block for download is a cobblestone pattern that my company uses in some of the projects (not everyone gets to work on Zaha's futuristic shapes...lol). You can Download it here. See the snapshot of the block below.
We use this block to hatch certain areas, and the way to do it quick and efficiently is using the SUPERHATCH Express Tool. When you call the SUPERHATCH command, you will see the following menu.
Here you will select Block as an option and use the downloaded "CAD-Addict.com cobblestone" Block. After doing this, simply follow the prompts, basically, you simply need to pick the initial position, rotation and scale, and then pick an internal point of the area you want to Superhatch.
The result will be a set of blocks clipped to fit the boundary selected. See below.
Remember that when selecting "internal point" if the drawing is heavy the computer might crash, so I would recommend you to switch off any unnecessary layers before attempting this operation.
This command has more options that have not been explored in this post, but I think you can get an idea of how powerful this is.
Show me more...
Labels:
AutoCAD,
Blocks,
Downloads,
Hatch Patterns
SketchUp Plugins: Extrude Edges using Edges
A Plugin to extrude a curved edge along a curved path.
Català - Castellano - Deutsch
Ruby programmer TIG has recently released a new awesome Plugin for Sketchup called extrudeEdgesByEdges.rb. With this Plugin you can extrude an edge along another one.
You can go to the original post at sketchucation.com to Download the plugin (you need to be registered). Before you do, see a quick snapshot of what this Ruby code does.
Chek here how to Install SketchUp Plugins.
Show me more...
Català - Castellano - Deutsch
Ruby programmer TIG has recently released a new awesome Plugin for Sketchup called extrudeEdgesByEdges.rb. With this Plugin you can extrude an edge along another one.
You can go to the original post at sketchucation.com to Download the plugin (you need to be registered). Before you do, see a quick snapshot of what this Ruby code does.
Chek here how to Install SketchUp Plugins.
Show me more...
AutoCAD: LISP Routine for Converting Splines to Polylines
A LISP Routine to Convert some SPlines to Polylines. It has some bugs though.
Català - Castellano - Deutsch
I was recently looking for a way to convert Splines to Polyines and found a LISP routine via Cadalyst. The routine works fine for Splines that we create from scratch. Unfortunately it doesn't work properly for Splines that have been generated when we offset an ellipse. In that case, the resulting polyline does not correspond to the spline we selected. For any other spline, it seems to work properly. You can download it at the cadalyst website.
As I previously explained, remember that you have the option to create ellipses as such or to do it creating an ellipse looking polyline through the PELLIPSE system variable.
Update: Kerry pointed out that there is a much easier way to convert Splines into Polylines. It is as simple as using the FLATTEN command for the spline you want to Convert. Thanks Kerry for the feedback.
Show me more...
AutoCAD Weekly Block #07: Dynamic Escalator - Side Elevation
Download this block and learn about setting angles for Stretch Actions
Català - Castellano - Deutsch
I am a bit behind on my weekly blocks but the truth is that the past weeks are being kind of crazy. Anyways, to catch up with this here comes issue #07 of the AutoCAD Weekly Blocks. This week I am sharing with you a dynamic block for an escalator that I created at work. The idea behind the block is that with a single escalator block we could cover any floor to floor height. First let's see a pic of the block so you know if you have interest reading further.
The original linework is a simplified version of a block obtained directly from Schindler, so the dimensions should be accurate for that manufacturer and very close for any other.
To turn the block into a dynamic one that stretches to fit to any floor to floor height we only need one Linear Parameter and a Stretch Action. Although the stretching we want to do has to be along the 30 degree angle defined by the escalator, we don't want to set the linear parameter in that direction. Let me explain you why. If we do so, the distance of the linear parameter will be the longitudinal distance of the escalator, that way, we would need some guides to know till what point we want to stretch it. What I want is to define the linear parameter to define the floor to floor distance but have the escalator stretch along the 30 degree slope. As complicated as it sounds in writing, it is very simple when it comes to defining the parameter and action. See the image below.
I defined a linear parameter to describe the floor to floor height (Distance in the image) and a Stretch Action. You can see the Stretch Polygon associated to the Action in a dotted line when you select the action. If we simply defined the parameter and action this way, the block would stretch vertically following the direction of the Linear parameter (distance). Instead we want it to stretch along the escalator direction (the 30 degree slope). The simple extra step we need to do for this is to select the Stretch action, go to properties and set the right angle.
In this case, the right angle is 300 (instead of 30) since the Angle count starts with the Distance parameter, not with the XY axis.
As you can see it is a very simple procedure and now you can use a single block while your boss decides what floor to floor height he really wants. You can select the grip of the block to extend it or, easier, go to properties and set the distance to the floor to floor height you need. You can Download the Block Here.
Show me more...
SketchUp Plugins: Improving the Selection Tools
Two Plugins that will improve drastically the way you can select objects.
Català - Castellano - Deutsch
I came across the next two plugins thanks to the SketchUp News website called "The Daily CatchUp". These two Plugins will help you select objects, edges or faces faster and smarter. Let's see them both.
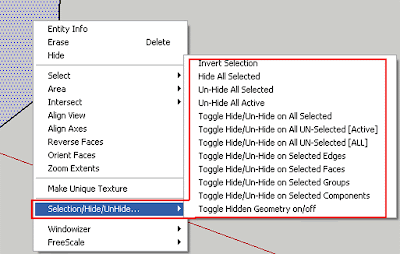
The first one is called SelectionHideShow.rb (click the link to the original post for download) and it adds extra options to the contextual menu (the right click menu). It is developed by TIG and its a great plugin to improve your selection capabilities. See this quick snapshot for the list of new selection options it will add to your right clicks.
If what you need most is to select only edges, then HoverSelect.rb from Fredo6 is your Plugin. It allows you to select edges in a new and practical way like clicking on one edge and dragging the mouse over the others, or selecting all edges of a face with a single click. It ads a user interface when the plugin is active like the one on the following image (click it to enlarge it).
HoverSelect requires the set of tools called LibFredo6 3.1 that can be downloaded here.
Show me more...
SketchUp Plugin: Shape Bender
An extremly useful Plugin to Bend an object to follow the profile of a curve
Català - Castellano - Deutsch
Not so long ago, I wrote a post about the Rhino command FlowAlonSrf (Flow Along Surface) that allows us to bend objects to match a curved surface. At that time I thought it was something I would not be able to do with SketchUp, but again the Ruby scripting community has surprised me positively.
There us a SketchUp Plugin written by Chris Fullmer that does something very similar. It is a bit less complete compared to Rhino's "Flow Along Surface", since in this case it bends objects using a curved line, but still it is a very good tool to have on your set of SketchUp tricks. See how using this tool I bended the following text to match a curved line.
I am going to post a video soon but on the mean time see the original post by Chris that already has a quick video on how to use it. You can use that post too to download the plugin.
Show me more...
SketchUp Plugins: 1001bit Tools
A Plugin with a full set of tools for Architecture to build your buildings way faster and easier
Català - Castellano - Deutsch
The commercial Plugin 1001bit Tools is an awesome set of Tools to streamline your modelling of buildings. It includes tools to do almost anything you would expect to need when modelling a building. We just purchased it at work and I couldn't wait to share it here. The tools sells for only 29 dollars, which I think is a pretty good deal for the amount of features that you get with it. See this video to check some of the features of this awesome plugin.
You can download a trial version for 30 days or purchase a license for 29 dollars.
Show me more...
AutoCAD Weekly Block #06: Dynamic Graphic Scale
Download this Block and learn a bit about Visibility states in Dynamic Blocks
Català - Castellano - Deutsch
This week's Block is a Graphic Scale created as a dynamic block that will be fit for the following scales: 1:50, 1:100, 1:200, 1:500 and 1:1000. The block is meant to be used on paper space. Download the block or see the image below.
The Block is created using a visibility state for each scale, so only the text that fits that scale will show. On the previous image you can see how if you click on the triangular grip of the bock, the different visibility states are shown.
The process of creation is simple. Once you have the linework and text for one of the scales, create the different visibility states for each of the scales. Copy the text and change it values to the one that fits the next scale and hide hat text on the scale you don't want it to be shown. Repeat the process for each scale you want to create. For more details on how to create and modify visibility states check this older post. To summarize what it is important check the buttons related to visibility states in the Block Editor and what they are for. They are situated on the upper right corner of the block editor interface. They are the following.
Show me more...
Català - Castellano - Deutsch
This week's Block is a Graphic Scale created as a dynamic block that will be fit for the following scales: 1:50, 1:100, 1:200, 1:500 and 1:1000. The block is meant to be used on paper space. Download the block or see the image below.
The Block is created using a visibility state for each scale, so only the text that fits that scale will show. On the previous image you can see how if you click on the triangular grip of the bock, the different visibility states are shown.
The process of creation is simple. Once you have the linework and text for one of the scales, create the different visibility states for each of the scales. Copy the text and change it values to the one that fits the next scale and hide hat text on the scale you don't want it to be shown. Repeat the process for each scale you want to create. For more details on how to create and modify visibility states check this older post. To summarize what it is important check the buttons related to visibility states in the Block Editor and what they are for. They are situated on the upper right corner of the block editor interface. They are the following.
- Toggles objects on other visibility states on and off.
- Makes an object visible in the current visibility state
- Hides an object form the current visibility state
- Calls the visibility states dialog box (where we will create different visibility states)
Show me more...
SketchUp Plugins: Unfold your model
Do you need to build a paper model of your Sketchup Model? There are Plugins to Unfold the model.
Català - Castellano - Deutsch
If you want to build a physical model of your SketchUp model, you can do it using the Unfold.rb Plugin. This free plugin can be downloaded here and what it does is exactly what its names says. It unfolds the faces of a model to a plane that you decide.
It is a bit tricky to use, and you have to plan ahead if your model is complicated to be sure that the faces are build in a way that can be unfold. But once you get the sense of how it works you will be able to "deconstruct" your model to transform it in a series of faces laying on the same plane. See the following video for a quick reference on how to do this.
There is also a commercial plug-in called Waybe that automates this process to a single click, but it sells at $50, which I find way overpriced.
Show me more...
Rhino Plugins: Paneling Tools
This is an awesome Plugin to create panels on NURBS surfaces. Another Rhino Beauty.
Català - Castellano - Deutsch
PanelingTools.rhp is an awesome plugin for Rhino to Panel surfaces. You can use the standard Paneling options provided with the Plugin, or generate custom Panels from any shape. The Plugin can be downloaded from the McNeel website. See this tutorial video on how to use Paneling Tools.
After you are done learning the basics, take a look at this other video on how to use the panelling tools with custom shapes.
Show me more...
AutoCAD Weekly Block #05: Dynamic Door
Download this Block and learn about Flip Parameters.
Català - Castellano - Deutsch
On this week's Block we will quickly see how to use the Flip Parameters/Actions. To do that we will use a block of a 80cm door, which in metric unit system would be the most common door you would need to use.
What we want to achieve adding the flip parameters is to be able to flip the door to open to one side or the other without the need to actually using the MIRROR command. So basically we need to add two flip parameters, one to flip the door to open right or left and another one to flip the door to open in or out. Download the block and you will see what it can do.
As you can see in the image above, when the block is selected it shows two arrows. This two arrows allow us to flip the block. But lets quickly see how this arrows work. If we enter the Block Editor, this is what we see.
What I have done is to create two Flip parameters (Flip State and Flip state 1 on the image) following the two perpendicular axis of the block. Then, I added a flip action to each of those parameters, and selected the door and the arch as objects. Nothing else, simple but effective. Of course if you are a user of AutoCAD Architecture this block is useless, but for those using plain AutoCAD this might be useful.
Show me more...
Subscribe to:
Posts (Atom)