Showing posts with label Plugins. Show all posts

SketchUp Plugins: 4D Construction Simulation For Free

A free Plugin to simulate the construction process
Català - Castellano - Deutsch
Not so long ago I posted on a couple of commercial plugins to simulate construction. recently I came across a free option that might help in the future simulate construction using SketchUp.

The Plugin is called onTime5D. On the video below you can see a very brief preview of its functionality. The plugin seems to be in process of development, you can follow up on this on the author's website.


I am adding this Plugin on the Previous post that can serve as a reference on the available SketchUp plugins for construction simulation.


Show me more...

SketchUp Plugins: Make Fur / Grass

A Plugin to generate Fur / Grass with a lot of control.
Català - Castellano - Deutsch
MAKE FUR (fur_en_v1_2.rb): Is a Plugin to create Fur / Hair or Grass created by tak2hata. It is very easy to use. See the following images.


Once you have installed the Plugin. Yo can access it via Right Click. Select a Face or a set of faces, Right click and select fur_1.2!. There are two options, a web dialog and an Imput dialog box. Either of them works very similarly. You can also access teh Plugin via the Plugins Menu.

You can download the Plugin here.

Via The Daily CatchUp

Show me more...

SketchUp Plugins: Export 3D PDFs

Export your SketchUp models to 3D PDF format to share them with people that doesn't have Sketchup
Català - Castellano - Deutsch
If you want to share your 3D model with someone that doesn't have SketchUp installed or you simply want to integrate your 3D model in a 3D presentation, you might be interested in this commercial plugin.
SimLab 3d PDF from Sketchup allows you to directly export 3D PDF from SketchUP. There is a free trial for 30 days. The license costs 95$.

Click on the image below to see a PDF created with this plugin


The free trial doesn't allow full control of the advanced features though. WIth a more complicated model, I also found some bugs (duplicated elements on the wrong position).

On the positive side, the plugin can export the section planes and it will add a buttpon to toggle them. So it really becomes like having sketchup (without editing tools) inside your pdf file. You can also select geometry and switch it off and on depending on what is it that you want to see.


Show me more...

SketchUp Plugins: Better Unfold Tool - Flattery

A new Free Plugin to unfold your Model in SketchUp.
Català - Castellano - Deutsch
Some time ago I posted about the Unfold Tool Plugin for SketchUp. Recently I found out throught the Daily CathUp that Pumpkinpirate has released a better Unfold tool called Flattery. I set myself to try it and produced this quick video about it.


The Plugin an be downloaded through the Pumpkinpirate website. Great Job.


Show me more...
SketchUp Plugins: Make your Model 3D-Print-Ready

A Plugin to help you turn your models into STL files ready for 3D Printing
Català - Castellano - Deutsch
With the evolution of 3D printing technology, 3D Printing is becoming more and more common during the design process. To get good results with 3D printing we need to be sure that our model is ready for it. Sketchup is a great design tool, but you will agree with me that sometimes a model might get quite messy if we are not paying too much attention to the way we model.

CADSpan has a free plugin to convert your model into what is called a "water tight" model. Water tight models are needed for the 3D printers to be able to produce the physical model in one piece. The Plugin also eliminates duplicated and overlapping faces. It basically cleans up the model and lets you export it to the STL file format system that's the standard. See the video below by CADSpan.


The Plugin can be found at the CADSpan website. There is a Free and a Pro Version of it.


Show me more...
SketchUp Plugins: TIG Extrusion Tools

A full set of Tools to execute diferent extrusion operations in SketchUp
Català - Castellano - Deutsch
I recently posted on some Plugins by TIG:

ExtrudeEdgesbyFace.rb,
ExtrudeEdgesByLathe.rb,
EstrudeEdgesByEdges.rb,
ExtrudeEdgesByRails.rb and
ExtrudeEdgesByLoft.rb.

These are part of a more complete set of Plugins by TIG that contains very other useful tools. The ones detailed here are the ones I found more useful (because I needed to use them), but the others are quite handy too. Installing the full set of tools from here, will add a Toolbar to SketchUp that will allow you to easy access all the Plugins on this set.


Alternatively, you can access them going to Plugins --> Extrusion Tools.

The Plugin Set can be downloaded here.

If you are new to SketchUp chek here to know how to Install SketchUp Plugins.


Show me more...

SketchUp Plugins: 4D Construction Simulation Plugins

Two Plugins to link Sketchup models with schedules and simulate the construction process
Català - Castellano - Deutsch
I was looking around for Plugins to use in sketchup to easily simulate the construction process. I am following a schedule management class, and would like to do a bit more than just the schedule part, but try to link it with a visualization of the construction model based on a simple SketchUp model. I came across two three plugins that seem to do the trick.

The first one, and the only free one, is called onTime5D. On the video below you can see a very brief preview of its functionality. The plugin seems to be in process of development, you can follow up on this on the author's website.


The first second one is called xD Virtual Builder, developed by D-Studio. It can be found at their website: www.4dvirtualbuilder.com. I tried it a bit, but didn't have the time to properly test it. As described in the features, it allows you to import schedule files in xml format from MS Project, Primavera and Asta Powerproject. You can check the Getting Started Tips, and take a look at the video below to get an overview of the Program. Unfortunately, it is not free, there is a free trial, but the cheapest version (without XML import) sells at $59.


The second third one is called Synchro Project Cosntructor. It is not just a Plugin for SketchUp but a full Scheduling and Project Controlling Tool. This is the reason why it is much more expensive, over $800. Nevertheless, it allows to import SketchUp Files and to then use its features to create a 4D simulation of the construction process. It imports MS Project and Primavera Files and seems more complete (it has to for the price!). Find more info on the Product Website and on the following video.


Any insights on these Plugins? Do you know of any free Plugin to create 4D simulations in SketchUp based on Schedules? Please share!


Show me more...

SketchUp Plugins: Extrude Edges by Face

Extrude any face along a path. it sound like Follow Me tool? Well it is much better and faster.
Català - Castellano - Deutsch
TIG set of Extrusion Tools is great. Another Tool of this set I wanted to show you here is the ExtrudeEdgesByFace.rb. This one allows you to Extrude a face following a line or set of lines (straight or curved). I know this might sound exactly as the Follow me Tool, but it is not. The advantages compared to the Follow Me Tool is that the Face doesn't need to be properly alligned with the profile to be extruded properly. See these two images.


If you want, you can rotate the face and use the Plugin again and the result would be this one.


Another advantage of this Plugin compared to the Follow me Tool is that it allows you to do multiple Extrude Operations at the same time. Like the one below. I selected the Face and all the paths, and in a single operation i got this result.


The Plugin is part of the Extrusion Tools by TIG. You can download them here.

If you are new to SketchUp chek here to know how to Install SketchUp Plugins.


Show me more...

SketchUp Plugins: Extrude Edges by Loft

A powerful Plugin to create a "Loft Surface" between curves.
Català - Castellano - Deutsch
Not so long ago, we saw the Loft Plugin by Chris Fullmer that allowed us to create Lofts between curved edges. Although the Plugin was useful, it had some imprecisions and not so much functionality.

TIG, inspired by this Plugin, has created the extrudeEdgesByLoft.rb Plugin. It is, for its functionality, like a much better version of the previous Plugin by Chris Fullmer. It creates the Loft surface with better precision from given curves, see below.


Besides creating the mesh, it allows you to choose if you want to reverse faces or soften the edges.


And even if you want to eliminate the edges you used to create the loft operation.


Another Great Plugin by TIG. It can be downloaded here (you need to be registered)together with other Extrude Tools that we will soon see here.

Chek here how to Install SketchUp Plugins.


Show me more...

SketchUp Plugins: Extrude with Rotation

Extrude Edges or faces with a rotation.
Català - Castellano - Deutsch
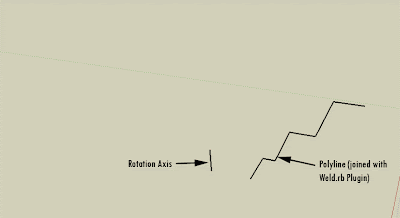
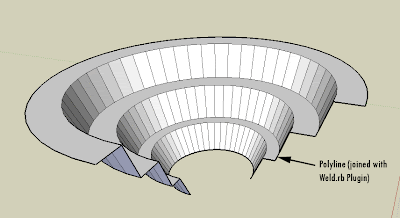
ExtrudeEdgesByLathe.rb by TIG allows us to Extrude Polylines or Faces following a circular path defined by an axis and a rotation angle. The Plugin is part of a suite of several Extrusion Plugins by the same Author that can be found here. The Plugin Allows you to do the following.


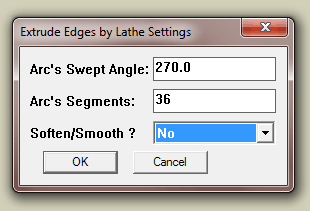
We can set all the properties of the extrusion on a dialog box that appears after we run the Plugin. These are the options for the previous example.


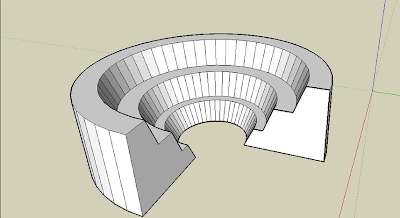
And if we select a face instead of a polyline, the plugin works too!!


Chek here how to Install SketchUp Plugins.


Show me more...
SketcHup Plugins: Component Stringer

Place components along a path with this awesome plugin from Chris Fullmer.
Català - Castellano - Deutsch
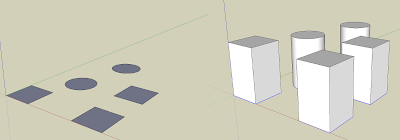
Placing components along a path is now a piece of cake with this Plugin from Chris Fullmer. The components allows several options like rotating the components as they are placed, scaling them etc. It is a very useful tool. I usually had to do this sort of task in AutoCAD using the MEASURE and DIVIDE commands. Now this can be done direclty and very easily in SketchUp. See Chris's video to get a better idea of what this does.


The plugin can be downloaded here. Big thanks to Chris for another great Plugin!

Chek here how to Install SketchUp Plugins.


Show me more...

SketchUp Plugin: Camera Recorder

Record your moves and export them as a set of images to create an animation
Català - Castellano - Deutsch
We saw on a previous post how to create an animation using the Flightpath.rb plugin. If what we want is to create a walkthrough, the Camera Recorder Plugin works better (at least for me). With this Plugin by Chris fullmer, you can walk through the mode using the walk tool from sketchup, and record the moves and get them exported to a series of images. See the video where Chris Explains how to use this Plugin.


You can download the plugin here


Show me more...

SketchUp Plugins: Create a Fly through animation

Do you need to create a flythrough animation in SketchUp? Use this plugin to set up the scenes.
Català - Castellano - Deutsch
The Flightpath.rb Plugin allows you to easily create fly through type of animation. It is very simple to use and has several options to set the target of the camera.


If you want to do a fly through sort of animation, you probably want to use the first option, which basically creates an animation where the camera follows the path (it basically uses the next node or vertex of the path as the camera target). For other sort of animations (like the one I am going to show on the next post) you can use the other three options which basically let you choose if the camera points to a single target all the time, if it changes target on a straight line from one point to another, or if the target moves also on a second path.

The Plugin can be downloaded here for free. There is a newer version of the plugin called Flightpath 2, also available at Smustard, it costs 7$, but I haven't tested it.


Show me more...

SketchUp Plugins: Extrude an Edge following two Rails

Another curved surface creation Plugin. SketchUp is becoming more powerful day by day. Thanks to TIG this time!
Català - Castellano - Deutsch
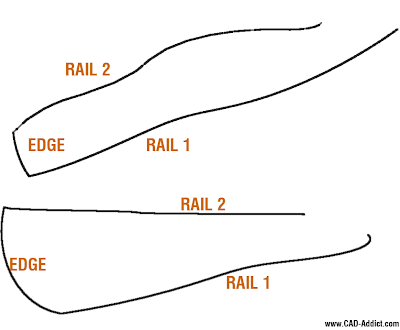
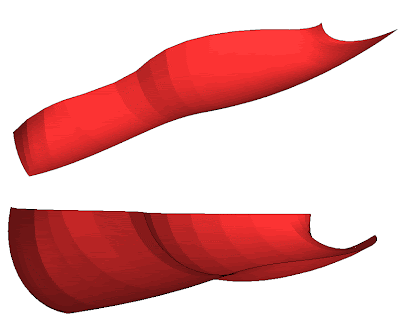
Need to extrude an edge following two contour edges? A new Plugin by TIG will do it for you. The "Extrude Edges by Rails" plugin developed by TIG allows you to select the edge to be extruded and the two rails to use as extrusion path.
On the following example, see how from the three curved lines shown on the upper picture, I created the surface on the lower picture. Pretty cool ha!?


To use it (after installing the plugin) go to Plugins-->Extrude Edges by Rails. Just a bit of advice before running it, the example shown here took more than 5 minutes to be created (I am running a 3 year old Laptop 2.0Ghz Core 2 Duo with 2Gb of Ram). At some point I though the computer was hung, but it didn't, just be patient.

You can download the Plugin here. Thanks to TIG.

Show me more...

SketchUp Plugin: Geometric Curve Smoothing

Another free form editing plugin for SketchUp. Who said sketchup could only handle boxy geometry??
Català - Castellano - Deutsch
Editing curves and so called free form geometry is something important when we want to design buildings that are something more than a set of boxy shapes. Slowly, the ruby programmers are coming with more and more plugins to do this, turning SketchUp slowly into a great tool, too, for free form modelling.
The latest one I came across with, is the Geometric Curve Smoothing. What it does is better explained on the video below.


The plugin is still under development (currently version 1.1 is out). You can download this version via the author's page.


Show me more...

SketchUp Plugins: Smart Push Pull

Push faces smartly with this plugin from a4chitect.
Català - Castellano - Deutsch
The standard push pull tool doesn't give us sometimes the results we want when the geometry we have is not formed by perpendicular faces. If we have oblique adjacent faces to the one we want to push/pull. Let's see an example of what I mean. On the following model, we want to push the face colored in orange.


The standard Push Pull tool only considers the selected face, regardless of what type of geometry is adjacent to that face. The result would be something like this.


But if what we want is that the push operation understands that there is an oblique face "touching" the face we are pushing, we need to use the SmartPushPull plugin created by a4chitect. This plugin will allow us to get the following result without the need of complicated cleanups.


The plugin is still under development, so I'll just post the link to the Sketchucation thread where you will be able to download it and get the newest versions as soon as they are published.
One of the things you will notice is that the current version v0.26 does not delete the original face and lines, but this can be partially solved by using the "delete coplanar edges" plugin, that we saw on a previous post at CAD-Addict.


Show me more...

SketchUp: Easy Paint different Objects with Random colors

Need to paint a bunch of faces randomly? Don't do it manually, there is a plugin for that.
Català - Castellano - Deutsch
Chris Fullmer published a while ago the plugin clf_extrapolate_colors.rb that allows us to paint a bunch of faces with random colors. It is very easy to use and it allows a good level of control on the randomization process, i.e. which colors should appear more often, etc.
On the smustard page where you can download the plugin there is also a very useful video posted by Chris that explains more in depth what this plugin is capable of.

Show me more...

SketchUp Plugins: Simplify Contours

Simplify your inework to optimize your model. Specially useful for site modeling to make terrains simpler.
Català - Castellano - Deutsch
Site modeling can become an issue because the model can become very heavy, specially if we model complex topography. The best way to create a 3D model from your topographic lines is to use the SandBox tools. Simply follow this process.
  • If you have a cad file with the topo lines at the right height each, simply import it to SketchUp (File --> Import --> Select DWG as the file format)
  • Then select the topo lines in SketchUp and click on the "from Contours" button in the Sandbox Tool Bar.

This will create a terrain, but depending on how detailed your topo lines where, this might create a very heavy (in terms of memory) terrain. If you don't need 100% accuracy on how the terrain is modeled (and almost no one does) and want to optimize your model size, use the SimplifyContours.rb Plugin. This Plugin allows you to select the topo lines (Contours) and simplify them as much as you want/need. If your original topographic lines were splines in AutoCAD this is definitely a must, otherwise your model will become unbearably heavy.
This is a pretty old plugin, but still 4 years later it can save you from a struggle with a super heavy terrain model. Download it here if you please.


Show me more...

SketchUp Plugins: Extrude Multiple faces at Once

Is there a way to offset a bunch of faces at once? There is a Plugin of course.
Català - Castellano - Deutsch
If we want to extrude (push/pull) a lot of faces the same distance, we might use the default SketchUp Push Pull tool, but it might take very long if we have a lot of faces. By default, if we push one face and then double click on different one, the new one will be push/pulled the same distance.
But what happens if we have 100 faces and we want to push them all the same distance? We need a piece of code to do that. The simplest ruby I found is called multiple_push_pull.rb. It does exactly that. We select all teh faces we want to extrude, go to Plugins --> Multiple Push Pull (after installing the Plugin of course). The result will be all the faces extruded the same distance. See this couple of examples.


I don;t know who wrote the plugin originally since the code doesn;t have any credits. In any case you can download it here.

Show me more...

SketchUp Plugins: Layer Manager

Manage Layers in SketchUp as if you were in AutoCAD. A great Plugin by Didie Bur
Català - Castellano - Deutsch
One of the main reasons why using layers in SketchUp was never very comfortable was the layer manager. The way the default layer manager works is not very practical (this is my opinion, but I really tend to forget about sing the different layers I created because of the Layer Browser).
Didier Bur and his LAYER MANAGER plugin have solved this issue. Layer Manager will add two toolbars to SketchUp that will make your life incredibly easier. This are the two toolbars you'll get.


Layer Manager basically works to create and manage layer states. This means for those who are not used to use layers, to save the state of the layers at a certain point (like having layer A and B visible and Layer C and D hidden) and be able to recover it at any point of time.
Layer Tools works to switch between current active layers, to move objects from layer to layer, and much more.
The best way to learn all the great functionaity of this Plugin is to Download it from the original Sketchukation thread (you need to be registered) and read the PDF that comes with the download.

Show me more...