Back with new content!

CAD Addict is back with plenty of posts ready to roll
Català - Castellano - Deutsch
I've been off for some weeks during August plus the rest of the month was so nice here in Barcelona weather wise that I had really no time to lock myself and try to write something. In the following weeks, I have decided to start posting my Master Thesis bit by bit.

Why am I doing that? Well, I am starting my PhD during this semester, and I want to revisit what I wrote almost a year ago. Plus since my PhD will deal in a way or another with the implications of BIM to improve the Spainsih construction industry, I thought any feedback from you on what I wrote would be of great help. To start, you can revisit the summary page of my MT here, and the list of references I used (with links to the articles) here.

To not bore all of those not so interested in the MT or in theretical BIM I will also be posting regularly the sort of posts that have made CAD Addict a place of reference for around 30000 visitors from 162 countries each month. So thanks for reading and please do leave feedback!


Show me more...

5 Mobile Apps for Architects

Android Mobile Apps for Architects.
Català - Castellano - Deutsch
Just came across this post from ColorCoat about 15 Mobile Apps for Architects. Since it only links to the Iphone apps, I searched for the Android Equivalent for those like me who haven't fallen for an Iphone yet. I actually ended up searching for apps I found to be more relevant to Architects, and came up with 5.

Sketchbook Mobile (0,69€) and Sketchbook Mobile Express (Free)
Remember the my last Christmas post? It was done with this app. See the video for the features.


Google Earth for Android (Free)
Explore the world from the palm of your hand with Google Earth.
Use Google Earth to fly around the planet with the swipe of a finger. Explore distant lands or reacquaint yourself with your childhood home. Search by voice for cities, places, and businesses. Browse layers including roads, borders, places, photos and more.


Architecture (1,38€)
Architechure! displays a slideshow of the most stunning, unique, and refined architectural works from around the world. Many well known photographers worked to bring you this art. All of these beautiful images can be saved as WALLPAPER!


AutoCAD WS (Free)
Experience the freedom of taking your designs with you — wherever you go.
AutoCAD® WS is a mobile CAD application that gives you the freedom and flexibility to view, edit, and share your DWG™ files on your Android phone or tablet. AutoCAD WS mobile app offers a simplified, intuitive set of viewing, editing, and markup tools so you can work on your designs while you are on the go.

Unit Converter - ConvertPad (Free)
Powerful and fully featured Unit converter, Currency converter and Calculator.
ConvertPad is a simple but the most powerful unit converter. It's intuitive and easy to use. Features fast, real time currency and unit conversion in a clean interface.

Do you know of any other app that could be added to this list?


Show me more...

Importing Google Earth Topography to AutoCAD and then to Revit

Step by step on how to turn a Google Earth terrain into Revit Topography.
Català - Castellano - Deutsch
Was recently trying to import a Google Earth Terrain into a Revit Project to show an overall view of it. Since I did the research on how to do it, I will share it here.

I will basically list the 20 steps (15 for AutoCAD users) with a brief explanation if necessary, I think that's enough to follow the precess. You might not need to do some of the first steps, but the guide is intended for everyone who doesn't even know about Autodesk Labs. So here it comes:
  1. Be sure you have A compatible version of AutoCAD (2007 or newer in 32bit 2011 or 2012 in 64bit). Be sure you have A compatible version of Google Earth (5.x or 6.x) if you don't download it here
  2. Register on Autodesk Labs
  3. Sign In to your Account at Autodesk Labs
  4. Download the Google Earth Extension for AutoCAD based Products here
  5. Save PublishDWGtoGE.zip to your computer.
  6. Unzip the PublishDWGtoGE.zip file.
  7. Browse the PublishDWGtoGE folder that comes from the .ZIP file and find your AutoCAD version installer (first the year and then the 32 or 64 bit option)
  8. Run the installer (extension .msi)
  9. Open AutoCAD and Google Earth and check that in AutoCAD any of this commands works:IMPORTGEIMAGE, IMPORTGEMESH, GETIME, PUBLISHKML
  10. If they work, follow to step 15, if they don't do the follwoing steps
  11. Check the AutoCAD folder to see if the file named AeccDWGToGE.arx is there (it should), if it doesn't repeat the installation in case something went wrong, otherwise keep reading
  12. Run the ARX command in AutoCAD and enter L for Load when it prompts for an option in the command line bar.
  13. Browse to your AutoCAD folder and load the AeccDWGToGE.arx file
  14. Center your Google Earth view to the terrain portion you want to import
  15. Now run IMPORTGEMESH in AutoCAD (you must have Google Earth running)and the terrain will be imported to AutoCAD from Google Earth. If you are an AutoCAD user you are done, if Revit user keep reading
  16. Save the AutoCAD file (you can close Google Earth and AutoCAD after this)
  17. Open Revit
  18. Go to Insert Tab on the Ribbon and select Link CAD (or Ipmort CAD doesn't seem to matter here) and browse to find the Topography file you saved from AutoCAD.
  19. Now and finally go to Massing and Site Tab on the Ribbon and select Topo Surface
  20. Click on "Create from Import" and click on the imported topography from AutoCAD
Might seem complicated but it is actually not.


Show me more...

Revit Bugs: Things that Revit Stairs don't do right #01

Every day I try to use Revit for Construction I see more and more how it has been completely thought mostly for design. Is that really BIM?
Català - Castellano - Deutsch
I still consider myself pretty new using Revit (less than 2 years experience and only 4 and a half projects), so when I am writing a post complaining about some of the things that do not work properly I try to check twice that they really don't work. If what I say is wrong, and you know the way to do it, please share here.

As far as I have managed to play with stairs, they are one of the family types lacking the most needed functionality. Since I am using revit for trying to get estimates, in my case the main functions that do not work properly are the following.

Area calculations for Stairs and their materials: to be able to get estimates of the costs of monolitic stairs (the most common one made of a concrete structure plus a paving materia for risers and threads) we need to be able to calculate the area of concrete that the stair has, and the area of paving materials.

Using the area of the concrete slab of the stair and landings as a unit might be a local thing, but this is how we do it here, so obtaining cubic meters of concrete slab is not what we need. I haven't found a way to obtain that, so stairs are one of the things I need to measure manually still when obtaining quatities from a Revit Model. I know I could paint the lower part of the stair with a different material, but I would rather have Revit handle Information better than that if it can. And my question at this point is Can it? If it can, please do let me know.

Second point on the list. Stairs have pavement material for threads and landings and another (or the same) material for risers. Although I can calculate riser and thread material surface by using the Width, Minimum Thread Depth and Actual Riser Height values to make some calculations, this is not good enough for landings would not be counted properly. I tried to obtain the materials from a Material Take Off Schedule, and relized Revit counts that wrong. Let me show you how wrong. Imagine a Stair that has 20 steps 0.28m deep and 1 meter wide. The easy calculations Depth x Width x Number of Threads gives us the Paving Area of the Threads. 19 x 0.28m x 1m = 5.32m2. Now lets see how Revit does calculatin this right? See the image below.


Surprise, Revit is giving me for that stair a Thread Material Area of 10.69m2, slightly more than double what it should give. What happens with Risers? The same my friend. 20 risers x 0.175 m (riser height) x 1 m (width) = 3.5 m2. As you see on the image the are that Revit counts ii twice that plus a bit more.

After playing with it a bit I realized Revit is giving the Area as the addition of the 6 faces of each thread or riser, so it is counting the area it should twice, plus adding the 4 side faces of risers and threads. Just wrong and useless.

Another thing stairs are lacking is the capacity to behave like floors (when monolitic, that is what they are). This is needed so they can enclose rooms and walls can get attached to them, right now as far as I know this can't be done, so it needs improvements.

Anyone thinks I am asking impossibles or knows of a way of doing all this that I am missing?


Show me more...

#Revit Plugin to Model Elevators

Easy and free plugin to model elevators in Revit
Català - Castellano - Deutsch
Elevators are one of the things that by default don't come in the Revit Libraries. No problem. The guys at DigiPara have released a free plugin called ElevatorArchitect that allows you to model them quite easily.

To see the plugin working or to download it, go to the Plugin Website.

via What Revit Wants.

Show me more...

Free Online Render Farm for #Revit and #AutoCAD: Project Neon

Autodesk has a new (not sure how new) servie to render your projects online using a free render farm.
Català - Castellano - Deutsch
If you have trouble rendering your Revit or AutoCAD projects because it takes too much time, you might want to try Autodesk's Project Neon. Project Neon is a Cloud Rendering service from Autodesk that allows you to render your projects using a bunch of computers placed somewhere instead of your local machine.

It works seamlessly with Revit (tested) and AutoCAD (I haven't tried with this one, but I would ask you what the hell are you doing working on 3D ACAD.. :-P). Here you can check the help info available.


I tried this from Revit and works OK, not the same quality as rendering directly in Revit, but roughly 20 times faster. Above there is an image of a project rendered using Project Neon, and then below this lines the same Project rendered with the Revit Render engine.


You can see that there are differences specially with that sort of "green fence". Reading the project neon help, I found this which I assume is the reason why the fence has no transparency.
Only image-based textures are supported at this time. Procedural textures, (Checker, Gradient, Marble, Noise, Speckle, Tiles, Waves, and Wood) are not supported.

A very interesting service specially for those with slow machines, and It's free!

Show me more...

Me, You and The Six Phases of #Revit

Very interesting post from the AUGI Blog: The six phases of Revit. Where are you now?
Català - Castellano - Deutsch
Randomly bumped into this post from the AUGI Blog. As you'll see it describes six phases of how users interact with Revit.

I find myself right in Phase 4: "The family editor eats you up and spits you out". LOL, that is how I feel sometimes when creating families (specially window and door families).

Reading the post I thought I'd ask users here at what Phase are you. Just to know what audience I am targeting. So feel free to click on the answer below.


Show me more...

#IPD: Integrated Project Delivery, an Introduction

I might be talking soon oftern about Integrated Project Delivery (IPD) so I thought I'd attach some introductory documents in case you are interested in following up the discussion
Català - Castellano - Deutsch
If you read the Summary of my Master Thesis published here a few months back, you might remember the topic of the Thesis was focused on BIM, but the fact that I ended up chosing that topic was a consequence of a thorough analysis of literature that indicated this was a relevant topic.

Part of the same literature that led me to study BIM in detail also pointed at "a need for better integration of project teams and collaboration between all parties". BIM is being regarded as one of the tools to enable this needed better integration (we could discuss here if BIM is a tool or a process, if you've been here for a while you might know that I see much more as a process than just as a tool, but we can discuss this point later on on another post).

The main improvement potential for better project outcomes though will not come just from implementing BIM, but also from implementing better collaboration among project stakeholders. There are two main lines of thought about this collaboration. One is the one followed by the Lean Construction Institute and their approach to Lean Project Delivery. The other, and the reason of this introductory post is the Integrated Project Delivery (IPD) paradigm.

We are trying at work to adapt part of the IPD approach to the Spanish Market to reach better project outcomes, improve the atmosphere of collaboration and increase client's satisfaction. We are still in the beginning and have no completed project to show resuts yet, but we are doing our best to adapt this approach to the way things can be done right here.

As an Introduction to IPD for those who know nothing about it there is this document from the American Institute of Architects that I think is a very good read to start.

Integrated Project Delivery: A Guide


I'll share here whatever I can of our journey trying to create Integrated Project Teams for Projects in Spain and Catalonia. I already took part in a sort of Integrated Project Team when I worked in Germany, so hope I can bring my little bit to this challenge. Anyone else has worked under IPD agreements? Any thoughts you'd like to share?

Show me more...

#Revit 2012: Using the Create Parts feature for Quantity Take-Off

I am a bit disappointed with the new Create parts feature, let me tell you why.
Català - Castellano - Deutsch
I was very excited about the new Create Parts feature for Revit 2012. I thought it would simplify a lot the process of extracting quantities from a Revit model, by allowing to play with the different layers of a wall or floor (as other BIM packages like Allplan allow). yesterday I gave you the link to the video explaining the features.

My disappointment came today, when I realized that whatever you modify using the Create Parts feature, doesn't get reflected in a default Material Take Off Schedule. My first thought was the following:
"I tried it, it simply doesn't do anything. So as far as i understand it, the Create Parts feature is just a tool for representation. This to me is the wrong approach to go Autodesk. Revit (and BIM) is not just for representation, if you can't get accurate Quantity Take-Offs and thus accurate estimates from a model, what is the point of BIM?"
But then I thought, this can't be it, such a cool feature can't end on a mere representation of parts. So I dug deeper and found that you can use it for Quantity Take-Off.


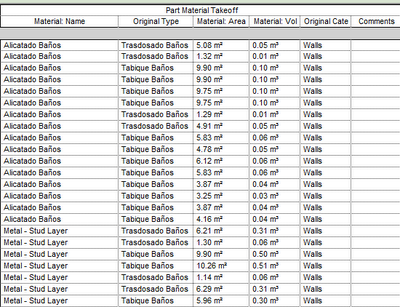
The key is that you need to create a Material Take-Off specific to list the parts, and you do it like this:
  1. Click View tab > Create panel > Schedule > Schedule/Quantities. Under Category, select “Part”
  2. Then add the categories you need for your take off, like Material: Name, Material: Area, Material: Volume, etc
It works, and it is great.

I am starting to realize as I read on this post, that REVIT CAN DO EVERYTUIN. Well not yet, but it is getting there, and this post and my chain OF thoughts should serve as an example of how sometimes we blame the Software (and the SOftware designers) for our own lack of expertise with it.

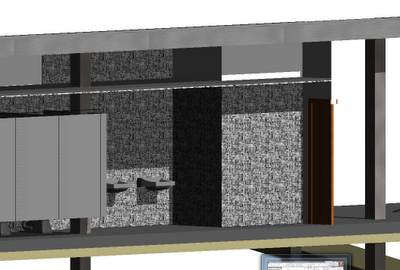
There is just one little BUT I haven't been able to solve. Using Parts combined with Groups doesn't seem to work well. After I created my Bathroom (the one on the first picture) I needed to copy that group all over the buidling since it repeats many times. When I used "Create Similar", the newly create Group, has all the parts reset to default. If you copy the group directly, it does work better, but in my example, some of the parts got reset as well to default.

Need to find out about this point if it is my fault or Revit's fault. So far it seems to be Revit's fault, since I am allowed to modify parts of elements that are inside groups without entering the edit gropu mode, and those changes are not reflected to other instances of the group. A little bug, hopefully it will be solved on Revit 2013.


BTW, I found the solution again via RevitWikiHelp, awesome database of solutions.


Show me more...

#Revit 2012: Video on the Use of the new "Create Parts"

Revit 2012 has a new feature called create parts to be able to manipulate the parts of complex elements like walls.
Català - Castellano - Deutsch
Just learned about the existence of the Twitter Autodesk account @RevitWikiHelp that provides a lot of links to useful resources on how to better use revit.

I learned about @RevitWikiHelp when they mentioned one of my posts. Now I follow them and I think they will be a great source of new Revit knowledge.

If you followed all the information on the new features of the new 2012 version of Revit, you probably know of the new "Create Parts" feature. this feature is key to work with some elements like exterior walls without the need of using complex Stacked Walls. I'll leave you with the video on this topic, which I think is good enough for you to understand the power of this feature.

Remember you can also follow the Blog using the twitter account @cadaddict where I also post short tips and retweets about Software and Processes for Construction, Architecture and Design


Show me more...

Revit: Organize the View List in the Project Browser

Easy steps to organize the view list in the Project Browser
Català - Castellano - Deutsch
The Project Browser is that window [probably] on the left side of the screen in Revit that you use to access all Plan, Section, 3D, Elevation views etc. I find the default organisation to not be very practical, specially when it comes to organizing the Floor Plan views.

I personally like to have the Floor Plan views to be organised the same way I see them on a Section or Elevation view. That is, the lowest level below, the highest level on top, and organised by elevation. To me this simplifies looking for each plan by mimicking their position on the building. You might want to do this or something different to suit your needs, but I guess this can help you anyway to know how to play with the Browser organisation.


To arrange the views the way you want, you should go to View Tab -> User Interface -> Browser Organisation (see picture above). There you will see that the Organisation you are using is probably the default one, the one that says ALL. This one can not be edited, but you can create a new browser organisation setting. Do that, and name it in a way that will make you easily recall what it is for, so in case you create several of them for different uses, you know what is what.


Then, play with the different settings to arrange the views the way you want. In my case it was pretty simple. Set them to be organised by Family and Type (this way Floor Plan views and Sections will be grouped separately) and then select Sort by -> Associated Level -> Descending.


This way I have my views organised by Level, allowing me easier access to them. (see below how the views were organised by default and how they were arranged using this method.


This is probably the most simple way to use this method, but it is key to understand it because for complicated projects with many types of views, you either organize them properly or you will never find the view / drawing you are looking for.


Show me more...

Can all sorts of Brains handle complex BIM models?

Does everyone have the capacity to handle complex 3D models?
Català - Castellano - Deutsch
Not so long ago I was talking to an architect, owner of a small firm, telling him he should seriously consider transitioning to a BIM platform. The only argument I couldn't refute was the one when he said "Everything sounds great to me, but if I wanted to implement BIM tomorrow, I wouldn't find skilled staff to do it" [in Spain]. Point taken, and I do believe it is true right now in Spain. As far as I have seen in the last 6 months, very few companies are using it, and what is most discouraging, students seem to come out of Architecture School with almost no BIM skills. (they ALL know SketchUp and AutoCAD to a relatively decent level, some know Rhino, all "Have heard" about Revit...).

This is a bit discouraging if you think about it, what if we get a huge project that requires us to set up a team of BIMable professionals? Will we find them, will they earn more than management? Questions I am asking myself these days, I guess we will find out soon if things work out.

On the other hand, and with a job market that sucks especially for Architects. Being able to work on a timely manner with complex BIM models might be in the future a very unique selling point on a CV. I have been working on a relatively complex BIM model (around 17000m2, with some 12 different levels, mezzanines, etc) and realized how complex it can be sometimes to navigate the model, to understand and visualize the different spaces inside the building. I am not sure everyone can do that, it requires a set of skills that differ completely with traditional CAD working in 2D dimensions, or even working on 3D for representation (where things can be fudged and faked just so they look good).


Proper BIM models to be used for Estimating, require a capacity to have the building in your brain in 3D to be able to see, find, detect possible errors or missing parts of the building. Shouldn't there be a slab? Isn't the drop ceiling missing here?

I am not very optimistic on the role of the Architect in the industry, and think that if the service delivered by Architects doesn't improve many functions will be taken from architects and delivered by other professionals with better quality.

But here is my bit of hopefulness for Architects. We as architects have learned for many years to think in 3D, to understand spaces, volumes, etc, so we have a slight advantage when it comes to working with complex 3D models. So BIM might be an opportunity for Architects to show they are more then just CAD monkeys drafting lines, and show their peers, bosses, etc that they can be of great help by being able to understand, model, compare, error check, etc complex BIM models.


Show me more...