Català - Castellano - Deutsch
On the previous post I talked about one of the issues I recurrently found when using Building Pads, their incorrect visual representation if you don't create them in a certain way. On this post I'd like to share a few points on how to use them properly to be able to get Cut and Fill counts, to be able to estimate the amount of Cubic Meters of Excavation of a project. On the documentation about Buiding Pads, there is information on how to create them and so on, but I think a few points are missing that are key to be able to use them the right way.
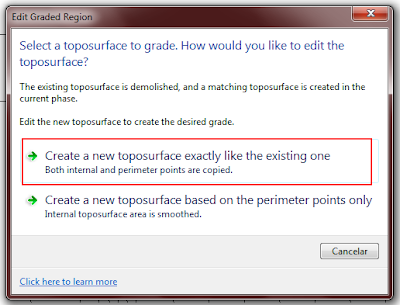
First of all, before creating any Building Pad, set the phase of the Topography to a Phase (I assume Existing would be the right one) and then set the phase of the view to the next one. Then, click on Graded Surface (on the massing & site Tab) select the topography, and on the dialog that appears, select the first option, see below, and simply accept the graded region like that pressing on the green "accept" symbol.

This will create an almost identical Topography to the existing one. If you don't do this first step, you will not get Cut and Fill counts when you create Building Pads. As I understand it, the count works as a comparison between one topography and the other, so without this step there is no topography to compare with.

At this point, you should have two identical surfaces, on on the Existing phase and one on the next one. I would hide the original topography at this point (Select it -> right click -> Hide in View -> Elements) so you know always that you are working with the new one that is the one you should modify.
All set until here. Now it is time to create the Building Pads. Very important point no to miss here. Revit allows you to create Building Pads by simply clicking on the Building Pad Button on the Massing & Site Tab. Don't do that. Be sure that first you select the Topography, then click on the Building Pad Button on the Massing & Site Tab. Otherwise, the Pad will be created, but sometimes (I haven't figured out why and how this happens) the Cut and Fill will not be reported on the Topography Schedule.

Create your Buidling Pad now, I am not going to describe this much because I think it is very simple and the documentation is good enough.
Next point, create a Topography Schedule if you don't have one (ideally your template should include one so you don't have to create one for each project). Then go to it and check what is being reported there. You will see probably three lines on the schedule, but you will not be able to know what is what. An important point to consider is Naming each Topography element differently. You should Name the existing Topo as "Existing" for instance, The copy as "Modified" or something like that and then each Topography created by adding the Building Pad with a different name that will allow you to identify it on the schedule. This is an example of a Schedule with the elements already named properly.

There is a Cut and Fill count on the "Modified" surface which I think comes from the slight difference between the two copies (the existing and modified topos) which might create a slight error on the total count, but my experience is that this amount is always negligible, compared to the total cut and fill counts obtained from the different topos related to the Building Pads.
Last two points to consider: First, creating a Buiding Pad, creates a Topography Element. It's important to understand that these are two separate but interrelated elements, if you delete one, the other will be deleted two (and the Modified topo will recover its previous shape).
Second, if you want to modify the Building Pad, you need to select the Building Pad Element (not the Topography Element) and then click on the "Edit Boundary" button that will appear on the ribbon. Unfortunately (as of Revit 2012) the Edit Boundary button does not appear if you are on a 3D view, so you will have to select the Pad from a Floor Plan view or similar. Since this might not be easy because all the elements that might show on that Floor plan view. I would select the Building Pad on any view where it is easy to select (I always have an Excavation 3D View with just Topos and Building Pads visible) deselect it, go to the Floor plan view and use the Select Previous function.
I think with this post and the previous one you can perfectly work with Topography and Building Pads and get accurate Cut and Fill quantities and the right visual representation. Hope this helps.
Tweet


I'm having an issue with building pads that I need help with. I have a topo that I created using the "graded region" tool, then added a building pad to it. All worked great. Now I need to add another pad to the same topo and in the same phase, but it keeps showing in the wrong phase. What's going wrong?
ReplyDeletethe numbers in the schedule don't make sense to me. maybe i am missing something here. but if the two topo elements do not require any fill. how is there a positive fill difference between the existing and modified. i am running into this same issue with my project. please explain
ReplyDeleteThanks so much for this. My 'new construction' pads were leaving holes in my 'existing' topo and this fixed it!
ReplyDelete