Revit: Walkthrough Examples

A video with some sample walkthroughs done in Revit.
Català - Castellano
This is a short promotional video we created to share with clients and partners some of the projects we've been working on in 2011. All are projects were BIM had a role, either as an experimentation exercise or truly as the tool to check for design inconsistencies or even later on as the basis of a quantity take-off and estimation.

I've been managing and modeling all these models, so well, a little self promotion isn't bad once in a while right? In a later post I will explain briefly how to create a walkthrough in Revit and a few tricks that might help on creating a video like the one below. Turn down the speakers bit, I think we got a bit too excited with the Music ;-P. Enjoy!


Show me more...

BIM and Facility Management

Very interesting article on BIM and FM at AECBytes
Català - Castellano - Deutsch
Was reading this great article about BIM and Facility Managment at AECBytes and found it very interesting. I never worked in anything related to Facility Management but to me it seems one of the fields in the entire Building Life-cycle that can benefit the most from good BIM implementation.

As a side line I used some of the info there to add some more tools to the BIM list of software and providers.

Cheers

Show me more...

Excel: Grouping Rows or Columns

When Excel Spreadsheets become big you might want to have your cells grouped so you can easily show and hide some of them as you please.
Català - Castellano - Deutsch
We use excel sheets for wide variety of uses. When theses spreadsheets become complicated and big or even huge, having ways to show or hide parts of the sheet is critical to be able to work with them without spending half of your time scrolling up and down (or even worse, left and right). On way to do that is to group cells together. And it is very simple to do.


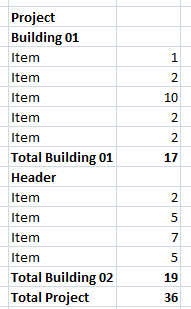
A common layout on spreadsheets is to have a header that precedes some items and even some sub-items. Something like you see on the picture above these lines. If want to be able to hide the items and only see headers and totals, we must do the following.
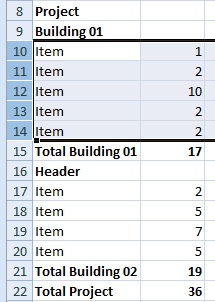
  1. Select the cells you want to group (be able to hide)
  2. Go to Data -> Group and select either Rows or Columns and click OK.
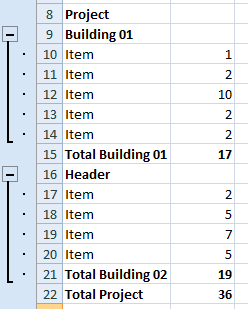
The result will be somthing like this, where Minus signs appear to the right to show you that you can hide some cells.


Then if you click on those minus signs, you can get something like this.


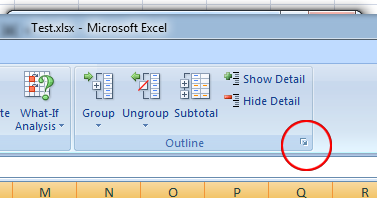
To be able to have the + / - signs on the upper part you have to go to the Layout settings and uncheck "summary rows below detail" (see images below)


Hope this helps!


Show me more...

Excel: Creating a Drop Down List with Values on a Different Sheet

Simple step by step guide on how to set up a drop down list in excel
Català - Castellano - Deutsch
In many situations we might want to have a cell in Microsoft Excel where only certain values from a list are allowed. The best way to do this is to create a drop down list with the closeable values. To do that, follow these simple steps.
  1. On a separate sheet (you can do it on the same one as well) create the list of values you want to appear in the drop down list. Put one in each cell.
  2. Drag select all those cells and enter a Name on the Name box (upper right near the formula bar). For this example we could use Listofvalues01 for example. use no spaces.
  3. Then select the cell (or multiple cells) where you want that drop down list to appear.
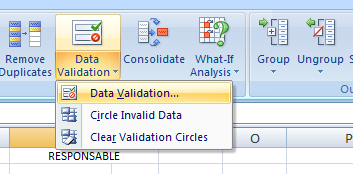
  4. With the cell or cell selected, go to the "Data" tab on the ribbon, and select Data validation -> Data Validation
  5. Go to the settings tab
  6. On "Allow" select "Lists" and check "ignore blank" and "in-cell drop down".
  7. On "Source" type =Listofvalues01 or whatever name you gave to the list of values on step 2.
  8. Click OK and go to the cell. An arrow should appear next to it and if you click on it you will see the list of closeable values
See the image below for a graphical explanation of this process.


Alternatively you could have the values on the same sheet where the drop down list appears. If you do so, you can avoid step 2, and on Step 7 instead of entering =Listofvalues01 you could simply select the cells where the list of values is (on the same sheet).

In Excel 2010, you can use this alternative method even on values being on a different sheet, but be aware that the drop down list will not work if the file is opened by a 2007 or previous version of Excel, so this option is not recommended. Either use the Namerange option (the one described in the 8 steps), or have the values in the same spreadsheet.

Show me more...

Revit: Transfer Materials, Families, Symbols from one Project to Another

Revit allows to transfer information from one project to another. No need to copy and paste.
Català - Castellano - Deutsch
If you need to use certain information from a project in another (family types, annotation symbols, building types, materials...) you can do so by simply going to the Manage Tab of the Ribbon, and then choosing the "Transfer Project Standards" button (see below).


Once you've clicked this you will get the menu where you can choose which element do you really want to import and from which project (in case you have ore than one project open). you need to have both projects open, the one you want import from and the one you want to import to. The operation must be done being on a view of the project you want to import to.


It is no doubt a much better way than copying and pasting elements. Ideally, you want to have a very thorough template so you don't need to do this, but sometimes, to create this template (at least your first Revit template) you might want to use this process to import families, and other standards to it from projects you worked on to later polish them in the template file.

Hope this helps

Show me more...

Master Thesis Update: Temporary Unavailable Online

I am temporarily removing the posts from my Master Thesis on the blog, let me explain you why very briefly
Català - Castellano - Deutsch
I had been publishing for the past month or so a series of post with the contents of my master thesis. Although I submitted my MT las January, I didn't start publishing it until this last September because I was awaiting the possibility of turning it into a scientific article.

The moment I thought that possibility had passed I decided to share it here. Recently I received a notification from my MT tutor that we will actually proceed on the attempt of creating two scientific articles from it. Since the contents of the article will be very very similar to those of the master thesis, I have decided to temporarily remove the contents from here in case having them here might decrease the chances of the article being accepted.

It is a bit against my preferred way of doing things that I do so. I believe sharing information is the best way that we have to improve, but as you will hopefully understand getting my first scientific paper published is right now very relevant for me professionally. I will in any case republish all those articles (if there is no copyright issues) once and if the article gets published (or rejected). Take it just as a delay in my sharing of the master thesis with all of you.

Of course if anyone needs some information about the topic of BIM as a PM tool, please do contact me and I will be happy to assist you.

Show me more...

Case Study: The use of Revit MEP by JG ingenieros

JG Ingenieros will explain its experience with the implementation and use of Revit MEP on an online webinar organised by A3D consulting.
Català - Castellano - Deutsch
JG Engineers is one of the leading engineering companies in the Spanish market and has a strong international presence. In recent months, JG has been implementing Revit MEP.

On Friday October 7, 2011, A3D Consulting has invited them to explain their experiences with this software. An online webinar very interesting for all those interested in Revit, BIM in general and Revit MEP and how and what is being done in Spain on these subjects.

To access the webinar you need to register through A3D Consulting. (The webinar will be held in Spanish).


Show me more...

Back with new content!

CAD Addict is back with plenty of posts ready to roll
Català - Castellano - Deutsch
I've been off for some weeks during August plus the rest of the month was so nice here in Barcelona weather wise that I had really no time to lock myself and try to write something. In the following weeks, I have decided to start posting my Master Thesis bit by bit.

Why am I doing that? Well, I am starting my PhD during this semester, and I want to revisit what I wrote almost a year ago. Plus since my PhD will deal in a way or another with the implications of BIM to improve the Spainsih construction industry, I thought any feedback from you on what I wrote would be of great help. To start, you can revisit the summary page of my MT here, and the list of references I used (with links to the articles) here.

To not bore all of those not so interested in the MT or in theretical BIM I will also be posting regularly the sort of posts that have made CAD Addict a place of reference for around 30000 visitors from 162 countries each month. So thanks for reading and please do leave feedback!


Show me more...

5 Mobile Apps for Architects

Android Mobile Apps for Architects.
Català - Castellano - Deutsch
Just came across this post from ColorCoat about 15 Mobile Apps for Architects. Since it only links to the Iphone apps, I searched for the Android Equivalent for those like me who haven't fallen for an Iphone yet. I actually ended up searching for apps I found to be more relevant to Architects, and came up with 5.

Sketchbook Mobile (0,69€) and Sketchbook Mobile Express (Free)
Remember the my last Christmas post? It was done with this app. See the video for the features.


Google Earth for Android (Free)
Explore the world from the palm of your hand with Google Earth.
Use Google Earth to fly around the planet with the swipe of a finger. Explore distant lands or reacquaint yourself with your childhood home. Search by voice for cities, places, and businesses. Browse layers including roads, borders, places, photos and more.


Architecture (1,38€)
Architechure! displays a slideshow of the most stunning, unique, and refined architectural works from around the world. Many well known photographers worked to bring you this art. All of these beautiful images can be saved as WALLPAPER!


AutoCAD WS (Free)
Experience the freedom of taking your designs with you — wherever you go.
AutoCAD® WS is a mobile CAD application that gives you the freedom and flexibility to view, edit, and share your DWG™ files on your Android phone or tablet. AutoCAD WS mobile app offers a simplified, intuitive set of viewing, editing, and markup tools so you can work on your designs while you are on the go.

Unit Converter - ConvertPad (Free)
Powerful and fully featured Unit converter, Currency converter and Calculator.
ConvertPad is a simple but the most powerful unit converter. It's intuitive and easy to use. Features fast, real time currency and unit conversion in a clean interface.

Do you know of any other app that could be added to this list?


Show me more...

Importing Google Earth Topography to AutoCAD and then to Revit

Step by step on how to turn a Google Earth terrain into Revit Topography.
Català - Castellano - Deutsch
Was recently trying to import a Google Earth Terrain into a Revit Project to show an overall view of it. Since I did the research on how to do it, I will share it here.

I will basically list the 20 steps (15 for AutoCAD users) with a brief explanation if necessary, I think that's enough to follow the precess. You might not need to do some of the first steps, but the guide is intended for everyone who doesn't even know about Autodesk Labs. So here it comes:
  1. Be sure you have A compatible version of AutoCAD (2007 or newer in 32bit 2011 or 2012 in 64bit). Be sure you have A compatible version of Google Earth (5.x or 6.x) if you don't download it here
  2. Register on Autodesk Labs
  3. Sign In to your Account at Autodesk Labs
  4. Download the Google Earth Extension for AutoCAD based Products here
  5. Save PublishDWGtoGE.zip to your computer.
  6. Unzip the PublishDWGtoGE.zip file.
  7. Browse the PublishDWGtoGE folder that comes from the .ZIP file and find your AutoCAD version installer (first the year and then the 32 or 64 bit option)
  8. Run the installer (extension .msi)
  9. Open AutoCAD and Google Earth and check that in AutoCAD any of this commands works:IMPORTGEIMAGE, IMPORTGEMESH, GETIME, PUBLISHKML
  10. If they work, follow to step 15, if they don't do the follwoing steps
  11. Check the AutoCAD folder to see if the file named AeccDWGToGE.arx is there (it should), if it doesn't repeat the installation in case something went wrong, otherwise keep reading
  12. Run the ARX command in AutoCAD and enter L for Load when it prompts for an option in the command line bar.
  13. Browse to your AutoCAD folder and load the AeccDWGToGE.arx file
  14. Center your Google Earth view to the terrain portion you want to import
  15. Now run IMPORTGEMESH in AutoCAD (you must have Google Earth running)and the terrain will be imported to AutoCAD from Google Earth. If you are an AutoCAD user you are done, if Revit user keep reading
  16. Save the AutoCAD file (you can close Google Earth and AutoCAD after this)
  17. Open Revit
  18. Go to Insert Tab on the Ribbon and select Link CAD (or Ipmort CAD doesn't seem to matter here) and browse to find the Topography file you saved from AutoCAD.
  19. Now and finally go to Massing and Site Tab on the Ribbon and select Topo Surface
  20. Click on "Create from Import" and click on the imported topography from AutoCAD
Might seem complicated but it is actually not.


Show me more...

Revit Bugs: Things that Revit Stairs don't do right #01

Every day I try to use Revit for Construction I see more and more how it has been completely thought mostly for design. Is that really BIM?
Català - Castellano - Deutsch
I still consider myself pretty new using Revit (less than 2 years experience and only 4 and a half projects), so when I am writing a post complaining about some of the things that do not work properly I try to check twice that they really don't work. If what I say is wrong, and you know the way to do it, please share here.

As far as I have managed to play with stairs, they are one of the family types lacking the most needed functionality. Since I am using revit for trying to get estimates, in my case the main functions that do not work properly are the following.

Area calculations for Stairs and their materials: to be able to get estimates of the costs of monolitic stairs (the most common one made of a concrete structure plus a paving materia for risers and threads) we need to be able to calculate the area of concrete that the stair has, and the area of paving materials.

Using the area of the concrete slab of the stair and landings as a unit might be a local thing, but this is how we do it here, so obtaining cubic meters of concrete slab is not what we need. I haven't found a way to obtain that, so stairs are one of the things I need to measure manually still when obtaining quatities from a Revit Model. I know I could paint the lower part of the stair with a different material, but I would rather have Revit handle Information better than that if it can. And my question at this point is Can it? If it can, please do let me know.

Second point on the list. Stairs have pavement material for threads and landings and another (or the same) material for risers. Although I can calculate riser and thread material surface by using the Width, Minimum Thread Depth and Actual Riser Height values to make some calculations, this is not good enough for landings would not be counted properly. I tried to obtain the materials from a Material Take Off Schedule, and relized Revit counts that wrong. Let me show you how wrong. Imagine a Stair that has 20 steps 0.28m deep and 1 meter wide. The easy calculations Depth x Width x Number of Threads gives us the Paving Area of the Threads. 19 x 0.28m x 1m = 5.32m2. Now lets see how Revit does calculatin this right? See the image below.


Surprise, Revit is giving me for that stair a Thread Material Area of 10.69m2, slightly more than double what it should give. What happens with Risers? The same my friend. 20 risers x 0.175 m (riser height) x 1 m (width) = 3.5 m2. As you see on the image the are that Revit counts ii twice that plus a bit more.

After playing with it a bit I realized Revit is giving the Area as the addition of the 6 faces of each thread or riser, so it is counting the area it should twice, plus adding the 4 side faces of risers and threads. Just wrong and useless.

Another thing stairs are lacking is the capacity to behave like floors (when monolitic, that is what they are). This is needed so they can enclose rooms and walls can get attached to them, right now as far as I know this can't be done, so it needs improvements.

Anyone thinks I am asking impossibles or knows of a way of doing all this that I am missing?


Show me more...

#Revit Plugin to Model Elevators

Easy and free plugin to model elevators in Revit
Català - Castellano - Deutsch
Elevators are one of the things that by default don't come in the Revit Libraries. No problem. The guys at DigiPara have released a free plugin called ElevatorArchitect that allows you to model them quite easily.

To see the plugin working or to download it, go to the Plugin Website.

via What Revit Wants.

Show me more...