2009 Posts of the Month

The most visited posts of 2009 by month.
Català - Castellano - Deutsch
As I already did last year here comes the list of the most visited posts of each month. This is just a way to make old posts accessible to those who joined CAD Addict recently. Hope you find something interesting. This is the list.
Note that there are some months when the shown post is the second one because the most visited one was the same as the previous month. I did it like this so there could be 12 different posts here.

Show me more...

Helping Haiti

Give a bit to help Haiti
Català - Castellano - Deutsch
After the Earthquake in Haiti the situation in the country is much worse than already was before. The reports I've been reading by some journalists, are really heartbreaking.
If you feel like you want to help, but you don't want to do it through religious organizations, the link on the image below will allow you to donate through Paypal to Red Cross International and Doctors without Borders. It takes 1 minute and less than 5 clicks. It's your call.


Click on the image or here to go to the donation page.

Show me more...

AutoCAD: Get Back the Menus and Toolbars - aka Ditch the Ribbon

Do you hate the ribbon? Do you want to get back your old menubar structure with toolbars? Easy and simple
Català - Castellano - Deutsch
I hate the ribbon, I confess it. It is not only the Ribbon in AutoCAD, its the whole Ribbon concept, I hate it too since it appeared in the new version of the Office package (2007).
Fortunately, AutoCAD allows you to switch back to the old system, it is a pretty simple process. You just need to do the following:
  • Type RIBBONCLOSE (it will close the ribbon)
  • Enter MENUBAR in the command line and type "1" as a new value (it will show the menubar)
  • Then go to the EXTRAS Menu and go to Toolbars, here you will be able to select the toolbars you want to see displayed

Update: On the bottom right of the screen there is a Workspace control button that by default reads "2D Drafting and Annotation". If we change that to "AutoCAD Classic" we will get the standard interface we were used to before the ribbon appeared. Thanks to Helen for this tip.


Show me more...

AutoCAD: PREVIEWFILTER system variable

Control which objects are highlighted in the selection preview
Català - Castellano - Deutsch
The selection preview is very useful to know before clicking which object you are going to select. The only problem it has is that if your objects are very complex, generating the preview might take some time, slowing down your workflow.
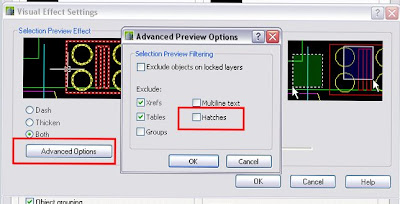
A clear example of objects that create issues if previewed are hatch patterns. Some time ago, I already wrote a post on How to Disable selection preview for Hatch Patterns. This post just wants to be a more comprehensive overview of how to control which objects are highlighted.
There is a system variable that allows us to control which objects are "selectionpreviewed". Te SV is PREVIEWFILTER, and as in other SV, the sum of the following values will result in some objects beeing excluded from the preview feature.

- 0 all objects are previewed
- 1 Objects on locked layers excluded
- 2 Objects in XREFs are excluded
- 4 Tables are excluded
- 8 Multiline objects are excluded
- 16 Hatch patterns excluded
- 32 Objects in groups are excluded

To exclude several object types, you need to enter the sum of the different values for this objects. For instance, if you want to exclude Hatch Patterns and Groups from selection previews, you will need to enter 48 as the value for the PREVIEWFILTER System Variable.
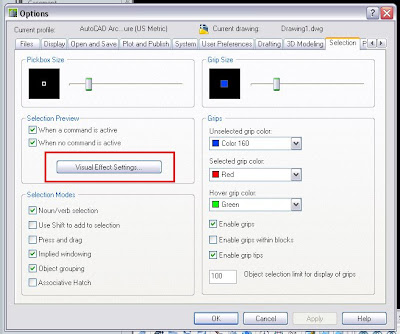
Alternatively, the controls for which objects are previewed can be accessed through Format --> Options --> Selection -->Visual Effects Options --> Advanced Options


Show me more...

SketcHup Plugins: Component Stringer

Place components along a path with this awesome plugin from Chris Fullmer.
Català - Castellano - Deutsch
Placing components along a path is now a piece of cake with this Plugin from Chris Fullmer. The components allows several options like rotating the components as they are placed, scaling them etc. It is a very useful tool. I usually had to do this sort of task in AutoCAD using the MEASURE and DIVIDE commands. Now this can be done direclty and very easily in SketchUp. See Chris's video to get a better idea of what this does.


The plugin can be downloaded here. Big thanks to Chris for another great Plugin!

Chek here how to Install SketchUp Plugins.


Show me more...

Windows 7

Anyone else hates windows 7 as much as Vista?
Català - Castellano - Deutsch
I just got a new laptop and it comes with Windows 7, I was XP user and was quite satisfied with it. Windows 7 (which to me it looks exactly like Windows Vista, my theory is that they just renamed it...)is killing me slowly...it is such a pain, so reatarded and so full of useless stuff that I am already trying to get a copy of Win XP x64 and format the laptop...
Anyone else having similar problems?

Just a few things I am struggling:
- Some programs do simply not start (like I was using Carbonite online backup, and now only works when Windows 7 decides it wants it to work)
- The notification icons on the taskbar appear and disapear when they want, the saved settings get randomly reverted to default for no reason
- Folders "don't load totally" being unable to see the icons for each type of file.

I mean, Mr Gates, stop playing with the stupid display and transparency options, and put please some time on making the system at least as fast and stable as XP.
Sorry all for the whinning, but I had to complain to someone that would listen, what is ur experience with windows 7??


Show me more...

2009 Top Ten Visited Posts

The ten favourite posts by the users in 2009 by the number of Unique Visitors
Català - Castellano - Deutsch
As I did last year with the Top Ten List of 2008, here comes the list of the top 10 visited posts all year round in 2009. Happy New year to Everyone! Keep visiting and commenting on this 2010. All the Best.
  1. List of Sketchup Plugins
  2. SketchUp Plugins: Make Faces From lines
  3. SketchUp Plugins: Weld
  4. SketchUp: Bonus Packs and Extra Materials
  5. SketchUp Plugins: Joint Push Pull
  6. SketchUp Plugins: Volume Calculator
  7. SketchUp Plugins: Loft
  8. SketchUp Plugins: Round Corners
  9. AutoCAD tutorial: Creating a dynamic block 1.0
  10. AutoCAD: Convert a 3D Model into a 2D drawing


Show me more...

SketchUp Plugin: Camera Recorder

Record your moves and export them as a set of images to create an animation
Català - Castellano - Deutsch
We saw on a previous post how to create an animation using the Flightpath.rb plugin. If what we want is to create a walkthrough, the Camera Recorder Plugin works better (at least for me). With this Plugin by Chris fullmer, you can walk through the mode using the walk tool from sketchup, and record the moves and get them exported to a series of images. See the video where Chris Explains how to use this Plugin.


You can download the plugin here


Show me more...

SketchUp: Exporting an animation with Good Quality.

SketchUp animations exports are pretty bad in quality, how to improve that?
Català - Castellano - Deutsch
I had to export an animation for a recent project at school, and the regular exports from SetchUp were way to bad in quality. So I set myself to try to find a better way to do that. A bit of research on the internet showed me that if you export the animation as individual images and compile them on a movie file, the results should be better. Following some of the advice from Colin Holgate on this thread I exported my different scenes as series of JPEGs (I didn't realise it was better to export as PNG, I read the thread to quickly). The export resolution as 2048 x 1152 for a 16:9 widescreen format. Colin on his post explained he exported at 4096 x 2304 px, but my machine is old and I was time pressed to finish this, so i had to sacrifice quality for time.
Also, the methodology is slightly different, since he was exporting from a Mac and I was doing it from a PC. In any case, the steps I followed were these:
  1. Set up the animation scenes using the FlightPath Plugin
  2. Configure the Animation so it does not pause on each scene (see this post about it)
  3. Export the Animation ( I used export as JPEG and quality 2048x1153px, ideally you want to export a bit higher quality and PNG format)
  4. Reduce the Exported Images to a lower resolution (I reduced them to 853 x 480px)
  5. Compile the images in a Movie file using Quicktime Pro
  6. Combine the different scenes and add credits + music using Adobe Premiere Pro
This is the video after following these steps.


As you can see, the quality is still not impressive. This is due to several reasons:
  • I exported as JPG by mistake instead of PNG
  • I should have exported the original images in higher quality to reduce the flickering of lines
  • It was my first time using Premiere, so I had no idea which settings I was using.

As you see, I am still a newby on this, I just wanted to share the work done. Anyone who has some advice on how to better attempt to get a high quality animation out of SketchUp that is still manageable in size, feel free to comment.


Show me more...

SketchUp Plugins: Create a Fly through animation

Do you need to create a flythrough animation in SketchUp? Use this plugin to set up the scenes.
Català - Castellano - Deutsch
The Flightpath.rb Plugin allows you to easily create fly through type of animation. It is very simple to use and has several options to set the target of the camera.


If you want to do a fly through sort of animation, you probably want to use the first option, which basically creates an animation where the camera follows the path (it basically uses the next node or vertex of the path as the camera target). For other sort of animations (like the one I am going to show on the next post) you can use the other three options which basically let you choose if the camera points to a single target all the time, if it changes target on a straight line from one point to another, or if the target moves also on a second path.

The Plugin can be downloaded here for free. There is a newer version of the plugin called Flightpath 2, also available at Smustard, it costs 7$, but I haven't tested it.


Show me more...

How do you Export SketchUp Layers to AutoCAD?

This is an open question, not a solution. Is there a Plugin for that?
Català - Castellano - Deutsch
I've been asked if there is a way to export the SketchUp layers when exporting to AutoCAD as 2D drawing. All my Google searches have been useless, so here comes the question in case someone can help with this.
Is there a Plugin to Export as 2D Drawing from SketchUp to AutoCAD and get the geometry to keep the layers from SketchUp?. Right now the only thing that seems possible is to separate the geometry in Cut Edges and Profile Edges.
SO please, if anyone knows how to do this share it here! THanks


Show me more...

SketchUp Plugins: Extrude an Edge following two Rails

Another curved surface creation Plugin. SketchUp is becoming more powerful day by day. Thanks to TIG this time!
Català - Castellano - Deutsch
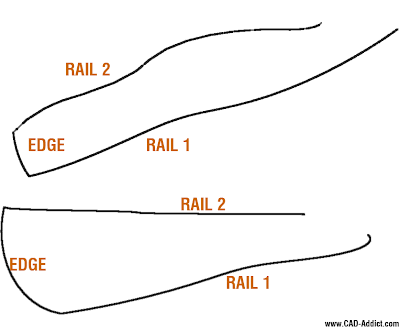
Need to extrude an edge following two contour edges? A new Plugin by TIG will do it for you. The "Extrude Edges by Rails" plugin developed by TIG allows you to select the edge to be extruded and the two rails to use as extrusion path.
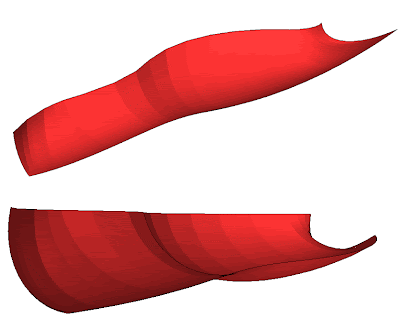
On the following example, see how from the three curved lines shown on the upper picture, I created the surface on the lower picture. Pretty cool ha!?


To use it (after installing the plugin) go to Plugins-->Extrude Edges by Rails. Just a bit of advice before running it, the example shown here took more than 5 minutes to be created (I am running a 3 year old Laptop 2.0Ghz Core 2 Duo with 2Gb of Ram). At some point I though the computer was hung, but it didn't, just be patient.

You can download the Plugin here. Thanks to TIG.

Show me more...